<?xml version="1.0" encoding="utf-8"?>
<feed xmlns="http://www.w3.org/2005/Atom">
    <title>asciijungle.com</title>
    <link href="https://asciijungle.com/atom.xml" rel="self" />
    <link href="https://asciijungle.com" />
    <id>https://asciijungle.com/atom.xml</id>
    <author>
        <name>Benjamin Brunzel</name>
        
    </author>
    <updated>2026-11-01T00:00:00Z</updated>
    <entry>
    <title>Guix Home on a Foreign Distro: Features per Machine and Tooling per Project</title>
    <link href="https://asciijungle.com/posts/2026-11-01-guix-features-and-per-project-tooling.html" />
    <id>https://asciijungle.com/posts/2026-11-01-guix-features-and-per-project-tooling.html</id>
    <published>2026-11-01T00:00:00Z</published>
    <updated>2026-11-01T00:00:00Z</updated>
    <summary type="html"><![CDATA[<article>
    <header>
        <h1>Guix Home on a Foreign Distro: Features per Machine and Tooling per Project</h1>
        <section class="date">
            Posted on 2026-11-01
            
        </section>
        <section class="tldr">
            <div>TL;DR</div>
            <span>You do not have to switch your Linux distribution to profit from Guix. I use Guix Home on top of Ubuntu, as well as Debian, to manage my configuration by using small features combined per machine. That way I provide every client workspace with its own tools like Java, VPN and database helpers.</span>
        </section>
    </header>
    <section>
        <p>There are plenty of introductions to the Guix package manager out there, so this is none of them. I rather wanted to share two ideas I use in my own current setup that made Guix useful for me without touching the operating system underneath. The first one is a way to structure the machines user level configuration as a whole in small <em>features</em> that I define using scheme lisp. They can be combined in different ways for different machines. The second one is to define different project workspaces that only have exactly the tooling that they need. This will become more clear in just a minute.</p>
<p>For all that I run <a href="https://guix.gnu.org/manual/1.5.0/en/html_node/Home-Configuration.html">Guix Home</a> on top of my regular linux distribution, currently Ubuntu 24.04 on my work laptop and Debian unstable on my personal MNT Reform<a href="#fn1" class="footnote-ref" id="fnref1" role="doc-noteref"><sup>1</sup></a>. Which distribution it is does not matter much. This would be applicable to any linux system you have. The distribution keeps managing the base system: The kernel, drivers, the display stack and audio system. In addition to that I use the guix package manager to manage and provision everything in my home directory. That would be my user’s programs, dotfiles containing my programms configuration and in addition to that user level background services that run under my personal user’s permissions.</p>
<h2 id="okay-wow-but-i-can-handle-my-system-without-learning-lisp-ben">Okay wow, but I can handle my system without learning lisp, Ben!</h2>
<p>Sure, but let me show you what got me excited to try this. First you can view my configuration some sort of a “backup” that can be applied to set up a new system. Say, when I set up a new machine I install guix, clone the repository and bootstrap the configuration from there. It installs all programms I need, my shell, my editor, my window manager config and my music daemon and all configurations for those. It’s configuration as code for my workstations.</p>
<p>Second, Guix is also a nice place to put small scripts, configs and tools. A package definition for a script or a tool of my own is only a few lines, and it installs like any other package. I can define the dependencies and have everything installed. Potentially if somebody else would be interested, I could provide packages to others through my guix channel, a special kind of git repository, as well. That makes writing own tools way more applicable than just having everything laying around.</p>
<h2 id="defining-features">Defining Features</h2>
<p>Let’s dive a bit deeper. I split my whole configuration into what I call <em>features</em>. How does that look like? A feature is just a Guile module defined in lisp that exports two lists: the package names it needs and the services it sets up. Once they are defined, a host file, so the one that describes what goes onto a Machine (host), just defines the features that machine should have.</p>
<p>This is how the files are laid out in my repository, which lives on the guix config directory:</p>
<pre class="example"><code>~/.config/guix/
└── modules/bbr/
    ├── hosts/
    │   ├── lt1550.scm     picks the features for my laptop
    │   └── reform.scm     picks the features for the Reform
    └── features/
        ├── base.scm
        ├── desktop.scm
        ├── music.scm      exports music-packages and music-services
        ├── music/
        │   └── mpd.conf   a plain config file, deployed as it is
        └── radio.scm
</code></pre>
<p>At evaluation time, guile finds a module by its name: <code>(bbr features music)</code> for example corresponds to the file <code>bbr/features/music.scm</code>. Configuration file templates for programs like <code>mpd.conf</code> are not modules, they just sit in a directory next to the feature that uses them.</p>
<p>As an example here is the first part of <code>features/music.scm</code>. It is a feature for my music player setup, and the package names defined in music-packages are the same ones you would pass to <code>guix install</code>:</p>
<div class="sourceCode" id="cb2"><pre class="sourceCode scheme"><code class="sourceCode scheme"><span id="cb2-1"><a href="#cb2-1" aria-hidden="true" tabindex="-1"></a>(<span class="ex">define-module</span><span class="fu"> </span>(<span class="fu">bbr </span>features music)</span>
<span id="cb2-2"><a href="#cb2-2" aria-hidden="true" tabindex="-1"></a>  #:use-module (gnu home services)</span>
<span id="cb2-3"><a href="#cb2-3" aria-hidden="true" tabindex="-1"></a>  #:use-module (gnu home services shepherd)</span>
<span id="cb2-4"><a href="#cb2-4" aria-hidden="true" tabindex="-1"></a>  #:use-module (gnu packages mpd)</span>
<span id="cb2-5"><a href="#cb2-5" aria-hidden="true" tabindex="-1"></a>  #:use-module (guix gexp)</span>
<span id="cb2-6"><a href="#cb2-6" aria-hidden="true" tabindex="-1"></a>  #:export (music-packages music-services))</span>
<span id="cb2-7"><a href="#cb2-7" aria-hidden="true" tabindex="-1"></a></span>
<span id="cb2-8"><a href="#cb2-8" aria-hidden="true" tabindex="-1"></a>(<span class="ex">define</span><span class="fu"> music-packages</span></span>
<span id="cb2-9"><a href="#cb2-9" aria-hidden="true" tabindex="-1"></a>  '(<span class="st">&quot;ncmpc&quot;</span> <span class="st">&quot;mpd&quot;</span> <span class="st">&quot;mpd-mpc&quot;</span>))</span></code></pre></div>
<p>This defines my music player setup. <code>mpd</code> is the music player daemon, <code>ncmpc</code> a terminal client for it and <code>mpd-mpc</code> a small command line tool to control it. Importing and using the packages like this is enough to get them installed. In the file there are also definitions for how to run mpd as a shepherd service, as well as how and where do deploy mpd’s configuration to:</p>
<div class="sourceCode" id="cb3"><pre class="sourceCode scheme"><code class="sourceCode scheme"><span id="cb3-1"><a href="#cb3-1" aria-hidden="true" tabindex="-1"></a>(<span class="ex">define</span><span class="fu"> mpd-shepherd-service</span></span>
<span id="cb3-2"><a href="#cb3-2" aria-hidden="true" tabindex="-1"></a>  (shepherd-service</span>
<span id="cb3-3"><a href="#cb3-3" aria-hidden="true" tabindex="-1"></a>    (documentation <span class="st">&quot;Run the Music Player Daemon.&quot;</span>)</span>
<span id="cb3-4"><a href="#cb3-4" aria-hidden="true" tabindex="-1"></a>    (provision '(mpd))</span>
<span id="cb3-5"><a href="#cb3-5" aria-hidden="true" tabindex="-1"></a>    (modules '((shepherd support)))</span>
<span id="cb3-6"><a href="#cb3-6" aria-hidden="true" tabindex="-1"></a>    (start #~(make-forkexec-constructor</span>
<span id="cb3-7"><a href="#cb3-7" aria-hidden="true" tabindex="-1"></a>              (<span class="kw">list</span> #<span class="op">$</span>(file-append mpd <span class="st">&quot;/bin/mpd&quot;</span>) <span class="st">&quot;--no-daemon&quot;</span> <span class="st">&quot;--stderr&quot;</span></span>
<span id="cb3-8"><a href="#cb3-8" aria-hidden="true" tabindex="-1"></a>                    (<span class="kw">string-append</span> (getenv <span class="st">&quot;HOME&quot;</span>) <span class="st">&quot;/.config/mpd/mpd.conf&quot;</span>))</span>
<span id="cb3-9"><a href="#cb3-9" aria-hidden="true" tabindex="-1"></a>              #:log-file (<span class="kw">string-append</span> %user-log-dir <span class="st">&quot;/mpd.log&quot;</span>)))</span>
<span id="cb3-10"><a href="#cb3-10" aria-hidden="true" tabindex="-1"></a>    (stop #~(make-kill-destructor))))</span>
<span id="cb3-11"><a href="#cb3-11" aria-hidden="true" tabindex="-1"></a></span>
<span id="cb3-12"><a href="#cb3-12" aria-hidden="true" tabindex="-1"></a>(<span class="ex">define</span><span class="fu"> music-services</span></span>
<span id="cb3-13"><a href="#cb3-13" aria-hidden="true" tabindex="-1"></a>  (<span class="kw">list</span> (simple-service 'music-shepherd home-shepherd-service-type</span>
<span id="cb3-14"><a href="#cb3-14" aria-hidden="true" tabindex="-1"></a>                        (<span class="kw">list</span> mpd-shepherd-service))</span>
<span id="cb3-15"><a href="#cb3-15" aria-hidden="true" tabindex="-1"></a>        (simple-service 'music-files home-files-service-type</span>
<span id="cb3-16"><a href="#cb3-16" aria-hidden="true" tabindex="-1"></a>                        `((<span class="st">&quot;.config/mpd/mpd.conf&quot;</span> ,(local-file <span class="st">&quot;music/mpd.conf&quot;</span>))))))</span></code></pre></div>
<p>I’ve defined several other features like this. For example my emacs config, or my work workplaces. Next, how do I assign them to machines now?</p>
<h2 id="assigning-features-to-hosts">Assigning Features to Hosts</h2>
<p>A host can bundle the features together and later deploy them towards a linux machine. The Reform has fewer features than my laptop because I do not need work related stuff there, so it’s host file is shorter. Here you can see the main part of <code>hosts/reform.scm</code>, which lists the features of this machine:</p>
<div class="sourceCode" id="cb4"><pre class="sourceCode scheme"><code class="sourceCode scheme"><span id="cb4-1"><a href="#cb4-1" aria-hidden="true" tabindex="-1"></a>(home-environment</span>
<span id="cb4-2"><a href="#cb4-2" aria-hidden="true" tabindex="-1"></a>  (packages (specifications-&gt;packages</span>
<span id="cb4-3"><a href="#cb4-3" aria-hidden="true" tabindex="-1"></a>              (<span class="kw">append</span> base-packages</span>
<span id="cb4-4"><a href="#cb4-4" aria-hidden="true" tabindex="-1"></a>                      emacs-packages</span>
<span id="cb4-5"><a href="#cb4-5" aria-hidden="true" tabindex="-1"></a>                      desktop-packages</span>
<span id="cb4-6"><a href="#cb4-6" aria-hidden="true" tabindex="-1"></a>                      music-packages</span>
<span id="cb4-7"><a href="#cb4-7" aria-hidden="true" tabindex="-1"></a>                      radio-packages)))</span>
<span id="cb4-8"><a href="#cb4-8" aria-hidden="true" tabindex="-1"></a>  (services (<span class="kw">append</span> base-services</span>
<span id="cb4-9"><a href="#cb4-9" aria-hidden="true" tabindex="-1"></a>                    music-services</span>
<span id="cb4-10"><a href="#cb4-10" aria-hidden="true" tabindex="-1"></a>                    desktop-services</span>
<span id="cb4-11"><a href="#cb4-11" aria-hidden="true" tabindex="-1"></a>                    emacs-services)))</span></code></pre></div>
<p>A feature that needs a background process or a dotfile adds that by using a service extension. The music feature for example, runs the Music Player Daemon under Shepherd, the user-level service manager of Guix Home, and deploys its configuration file next to it. That is the what you saw in the second part of <code>features/music.scm</code>.</p>
<p>When I want my music setup on a new machine, I add <code>music-packages</code> and <code>music-services</code> to its host file. When I do not want it anymore, I remove those two names.</p>
<p>The deploy command points Guix at the directories with my modules, and the host file of the current machine is the one to apply. The second <code>-L</code> is the directory with the package definition of one of my own tools, more on that below:</p>
<div class="sourceCode" id="cb5" data-org-language="sh"><pre class="sourceCode bash"><code class="sourceCode bash"><span id="cb5-1"><a href="#cb5-1" aria-hidden="true" tabindex="-1"></a><span class="ex">guix</span> home <span class="at">-L</span> ~/.config/guix/modules <span class="at">-L</span> ~/dev/archiving/packaging <span class="dt">\</span></span>
<span id="cb5-2"><a href="#cb5-2" aria-hidden="true" tabindex="-1"></a>  reconfigure ~/.config/guix/modules/bbr/hosts/reform.scm</span></code></pre></div>
<h3 id="packages-that-are-not-in-guix-yet">Packages that are not in Guix yet</h3>
<p>A feature can also use packages that do not exist in Guix at all. For example my <code>radio</code> feature does that. It installs two small command line tools I have written and packaged myself.</p>
<ul>
<li><code>azi-qso-map</code> generates azimuthal maps from the log files of my amateur radio activations, which I described in <a href="https://asciijungle.com/posts/2026-08-05-visualizing-pota-activations-azimuthal-maps-from-adif.html">a previous post</a>.</li>
</ul>
<p>The package definition of <code>azi-qso-map</code> is published in my own Guix channel, a git repository that Guix pulls package definitions from. That can be wrapped in it’s own <em>feature</em> definition like this:</p>
<div class="sourceCode" id="cb6"><pre class="sourceCode scheme"><code class="sourceCode scheme"><span id="cb6-1"><a href="#cb6-1" aria-hidden="true" tabindex="-1"></a>(<span class="ex">define-module</span><span class="fu"> </span>(<span class="fu">bbr </span>features radio)</span>
<span id="cb6-2"><a href="#cb6-2" aria-hidden="true" tabindex="-1"></a>  #:use-module (asciijungle packages azi-qso-map)</span>
<span id="cb6-3"><a href="#cb6-3" aria-hidden="true" tabindex="-1"></a>  #:export (radio-packages))</span>
<span id="cb6-4"><a href="#cb6-4" aria-hidden="true" tabindex="-1"></a></span>
<span id="cb6-5"><a href="#cb6-5" aria-hidden="true" tabindex="-1"></a>(<span class="ex">define</span><span class="fu"> radio-packages</span></span>
<span id="cb6-6"><a href="#cb6-6" aria-hidden="true" tabindex="-1"></a>  '(<span class="st">&quot;azi-qso-map&quot;</span>))</span></code></pre></div>
<p>For the host it makes no difference whether a package comes from Guix itself or from my own definitions. That concludes what I wanted to show regarding the feature composition.</p>
<h2 id="workspaces-one-directory-per-customer">Workspaces: one directory per customer</h2>
<p>Another interesting part for my daily work is how I handle projects workspaces in this setup. Each client at work gets its own directory below <code>~/dev</code>, for example <code>~/dev/client-a</code> and <code>~/dev/client-b</code>. All the repositories of that customer live inside. A single <code>work</code> feature deploys what each workspace needs, and a few things happen automatically as soon as I enter the directory.</p>
<h3 id="the-right-git-identity">The right git identity</h3>
<p>Every customer has its own email address, SSH key and commit signing rules. Git can switch these based on the location of the repository:</p>
<div class="sourceCode" id="cb7"><pre class="sourceCode conf"><code class="sourceCode toml"><span id="cb7-1"><a href="#cb7-1" aria-hidden="true" tabindex="-1"></a><span class="kw">[includeIf</span> <span class="kw">&quot;</span><span class="dt">gitdir:~/dev/client-a/**&quot;</span><span class="kw">]</span></span>
<span id="cb7-2"><a href="#cb7-2" aria-hidden="true" tabindex="-1"></a>    <span class="dt">path</span> <span class="op">=</span> <span class="er">~/</span><span class="dt">dev</span><span class="er">/</span><span class="dt">client-a</span><span class="er">/</span><span class="dt">client-a.gitconfig</span></span>
<span id="cb7-3"><a href="#cb7-3" aria-hidden="true" tabindex="-1"></a></span>
<span id="cb7-4"><a href="#cb7-4" aria-hidden="true" tabindex="-1"></a><span class="kw">[includeIf</span> <span class="kw">&quot;</span><span class="dt">gitdir:~/dev/client-b/**&quot;</span><span class="kw">]</span></span>
<span id="cb7-5"><a href="#cb7-5" aria-hidden="true" tabindex="-1"></a>    <span class="dt">path</span> <span class="op">=</span> <span class="er">~/</span><span class="dt">dev</span><span class="er">/</span><span class="dt">client-b</span><span class="er">/</span><span class="dt">client-b.gitconfig</span></span></code></pre></div>
<p>Each included file sets <code>user.email</code>, the SSH key to use and whether commits are signed. This git config is managed by my <em>work</em> feature in guix.</p>
<h3 id="installing-different-software-tools-per-workspace">Installing different Software Tools per Workspace</h3>
<p>Customers do not agree on tooling. One project needs a certain Java and Python, another one needs a database client library, Node.js and Ansible on top. I do not want any of this installed globally, and I do not want to remember which version belongs where.</p>
<p>Each workspace gets a manifest, which is just a list of Guix packages:</p>
<div class="sourceCode" id="cb8"><pre class="sourceCode scheme"><code class="sourceCode scheme"><span id="cb8-1"><a href="#cb8-1" aria-hidden="true" tabindex="-1"></a>(specifications-&gt;manifest</span>
<span id="cb8-2"><a href="#cb8-2" aria-hidden="true" tabindex="-1"></a>  '(<span class="st">&quot;openjdk@25.0.2:jdk&quot;</span></span>
<span id="cb8-3"><a href="#cb8-3" aria-hidden="true" tabindex="-1"></a>    <span class="st">&quot;python&quot;</span>))</span></code></pre></div>
<p>Next to it Guix Home deploys an <code>.envrc</code> for direnv<a href="#fn2" class="footnote-ref" id="fnref2" role="doc-noteref"><sup>2</sup></a>:</p>
<div class="sourceCode" id="cb9" data-org-language="sh"><pre class="sourceCode bash"><code class="sourceCode bash"><span id="cb9-1"><a href="#cb9-1" aria-hidden="true" tabindex="-1"></a><span class="ex">use</span> guix <span class="at">-m</span> manifest.scm</span>
<span id="cb9-2"><a href="#cb9-2" aria-hidden="true" tabindex="-1"></a></span>
<span id="cb9-3"><a href="#cb9-3" aria-hidden="true" tabindex="-1"></a><span class="va">JAVA_HOME</span><span class="op">=</span><span class="st">&quot;</span><span class="va">$(</span><span class="fu">dirname</span> <span class="st">&quot;</span><span class="va">$(</span><span class="fu">dirname</span> <span class="st">&quot;</span><span class="va">$(</span><span class="fu">readlink</span> <span class="at">-f</span> <span class="st">&quot;</span><span class="va">$(</span><span class="fu">which</span> java<span class="va">)</span><span class="st">&quot;</span><span class="va">)</span><span class="st">&quot;</span><span class="va">)</span><span class="st">&quot;</span><span class="va">)</span><span class="st">&quot;</span></span>
<span id="cb9-4"><a href="#cb9-4" aria-hidden="true" tabindex="-1"></a><span class="bu">export</span> <span class="va">JAVA_HOME</span></span>
<span id="cb9-5"><a href="#cb9-5" aria-hidden="true" tabindex="-1"></a></span>
<span id="cb9-6"><a href="#cb9-6" aria-hidden="true" tabindex="-1"></a><span class="ex">PATH_add</span> bin</span></code></pre></div>
<p>This enables that when I <code>cd</code> into <code>~/dev/client-a</code> with a shell, direnv builds an environment from the manifest and puts those packages on my <code>PATH</code>. <code>JAVA_HOME</code> is derived from the Java that is now first on the <code>PATH</code>. When I leave the directory, everything is gone again. <code>java</code> in <code>~/dev/client-b</code> is a different one than in <code>~/dev/client-a</code>, and in my home directory there is none at all. A project that still needs an older Java only changes one line in the manifest of its workspace.</p>
<h3 id="installing-small-helper-scripts">Installing small helper scripts</h3>
<p>The last line of the <code>.envrc</code>, <code>PATH_add bin</code>, makes a <code>bin</code> directory of the workspace available. Home deploys small scripts there that only make sense for that customer. Two I use all the time are called <code>vpn</code> and <code>db</code> in almost every workspace, so these work the same way for each customer<a href="#fn3" class="footnote-ref" id="fnref3" role="doc-noteref"><sup>3</sup></a>.</p>
<p>The <code>vpn</code> script opens the tunnel to the customer’s network, simplified like this:</p>
<div class="sourceCode" id="cb10" data-org-language="sh"><pre class="sourceCode bash"><code class="sourceCode bash"><span id="cb10-1"><a href="#cb10-1" aria-hidden="true" tabindex="-1"></a><span class="co">#!/bin/sh</span></span>
<span id="cb10-2"><a href="#cb10-2" aria-hidden="true" tabindex="-1"></a><span class="ex">cloudflared</span> access tcp <span class="at">--hostname</span> https://vpn.example.com <span class="at">--url</span> localhost:6432</span></code></pre></div>
<p>The <code>db</code> script then connects to the test database through that tunnel. It reads the credentials from the cluster and starts <code>psql</code>, either interactively or with a query given as an argument:</p>
<div class="sourceCode" id="cb11" data-org-language="sh"><pre class="sourceCode bash"><code class="sourceCode bash"><span id="cb11-1"><a href="#cb11-1" aria-hidden="true" tabindex="-1"></a><span class="ex">db</span> <span class="st">&quot;select count(*) from accounts&quot;</span></span></code></pre></div>
<p>In another workspace, <code>db</code> talks to a completely different kind of database with different tools, but I type the same thing. The knowledge about how to reach test data is part of the configuration instead of living only in my head or in an outdated wiki page.</p>
<h3 id="wiring-it-all-up">Wiring it all up</h3>
<p>All of this is declared in the <code>work</code> feature. It is one list of files to deploy:</p>
<div class="sourceCode" id="cb12"><pre class="sourceCode scheme"><code class="sourceCode scheme"><span id="cb12-1"><a href="#cb12-1" aria-hidden="true" tabindex="-1"></a>(<span class="ex">define</span><span class="fu"> work-services</span></span>
<span id="cb12-2"><a href="#cb12-2" aria-hidden="true" tabindex="-1"></a>  (<span class="kw">list</span> (simple-service 'work-files home-files-service-type</span>
<span id="cb12-3"><a href="#cb12-3" aria-hidden="true" tabindex="-1"></a>                        `((<span class="st">&quot;dev/client-a/.envrc&quot;</span> ,(local-file <span class="st">&quot;work/client-a.envrc&quot;</span>))</span>
<span id="cb12-4"><a href="#cb12-4" aria-hidden="true" tabindex="-1"></a>                          (<span class="st">&quot;dev/client-a/manifest.scm&quot;</span> ,(local-file <span class="st">&quot;work/client-a.manifest&quot;</span>))</span>
<span id="cb12-5"><a href="#cb12-5" aria-hidden="true" tabindex="-1"></a>                          (<span class="st">&quot;dev/client-a/bin/vpn&quot;</span> ,(local-file <span class="st">&quot;work/client-a-vpn&quot;</span> #:recursive? <span class="dv">#t</span>))</span>
<span id="cb12-6"><a href="#cb12-6" aria-hidden="true" tabindex="-1"></a>                          (<span class="st">&quot;dev/client-a/bin/db&quot;</span> ,(local-file <span class="st">&quot;work/client-a-db&quot;</span> #:recursive? <span class="dv">#t</span>))</span>
<span id="cb12-7"><a href="#cb12-7" aria-hidden="true" tabindex="-1"></a>                          (<span class="st">&quot;dev/client-b/.envrc&quot;</span> ,(local-file <span class="st">&quot;work/client-b.envrc&quot;</span>))</span>
<span id="cb12-8"><a href="#cb12-8" aria-hidden="true" tabindex="-1"></a>                          (<span class="st">&quot;dev/client-b/manifest.scm&quot;</span> ,(local-file <span class="st">&quot;work/client-b.manifest&quot;</span>))))))</span></code></pre></div>
<p>The <code>work</code> feature is only part of my laptop’s host file. The Reform has no customer directories at all and therefore does not get any of this.</p>
<p>I really like this way of setting things up. It allows me to keep things separated and orientate myself quickly. It would even be possible to share configurations accross the team if more people want to use guix for their config setup.</p>
<h2 id="limitations-and-challenges-ive-encountered">Limitations and Challenges I’ve encountered</h2>
<p>While setting this up and using it for more and more aspects of my system I came across a few challenges and also limitations of Guix.</p>
<p>First of all the performance of Guix is not blazingly fast. The first apply takes a long time. That is because there are several parts of the system that are compiled and all the dependencies have to be fetched onto the machine. On the MNT Reform it ran for several hours until everything was in place. Later changes are fast, because only what changed gets rebuilt but setting up initially just takes time.</p>
<p>Another thing is that I do not manage everything on my machine using Guix. Some tools I still manage from the distribution, those are for example parts of the desktop, the sound system, system tools etc. The distribution stays in charge of the base system. Moving to Guix OS is an option for the future but honestly the system works like this too. Of course there are also propietery tools that are not offered via guix. AWS cli, intellij and google chrome for example. Those have to still be installed and updated by hand.</p>
<p>The first rollout to another machine also lead to small surprises. A different version of a program in another distribution can mean a differently named setting in a config file for the desktop for example. That is why it makes sense to keep the system configurations alike as much as possible. My host files handle those differences with a parameter, but I only find them by trial and error. That being said it is awesome that guix can manage this after all. The two laptops that I provision run on different processor architectures (AMD 64 vs aarch64) and I was able to set everything up with only minor changes.</p>
<h2 id="conclusion">Conclusion</h2>
<p>For me, the combination of features and workspaces is what makes Guix Home worth it. Features make my configuration modular with a machine definition that is just a short list of identifiers. Workspaces make my customer work tidy with the right git identity, the correct tools and the command line helpers that show up when I enter a disoctory and disappear when I leave again. To me that is a nice benefit which got me enjoying this setup at the moment. To be fair this can also be accomplished by just using direnv but without guix I find this tedious to pull off.</p>
<p>And I am aware that you can accomplish similar things with different tools. If you have used Nix, devenv or plain version managers for similar things, I’d be curious to learn about your setup and how your solution compares to this. And if you’d like to see more details about a part of this setup just let me know. As always I’m happy to get in touch. Cheers and thanks for taking the time.</p>
<h2 id="footnotes">Footnotes</h2>
<section id="footnotes" class="footnotes footnotes-end-of-document" role="doc-endnotes">
<hr />
<ol>
<li id="fn1"><p>The <a href="https://shop.mntre.com/products/mnt-reform">MNT Reform</a> is an open hardware laptop. I wrote about <a href="https://asciijungle.com/posts/2020-06-09-backed-mnt-reform.html">backing it</a> a while ago. Mine is an aarch64 machine, so it was a good test for a configuration that should work on more than one processor architecture.<a href="#fnref1" class="footnote-back" role="doc-backlink">↩︎</a></p></li>
<li id="fn2"><p><a href="https://direnv.net/">direnv</a> is an awesome tool that loads and unloads environment variables depending on the current directory. Its standard library has a <code>use guix</code> function that builds the environment from a manifest with <code>guix shell</code>. This is the base I use for having the same command behave differently in different environments.<a href="#fnref2" class="footnote-back" role="doc-backlink">↩︎</a></p></li>
<li id="fn3"><p><code>#:recursive? #t</code> in <code>local-file</code> copies the file into the store including its permissions. Without it the deployed script would not be executable. I think the naming here is a bit missleading.<a href="#fnref3" class="footnote-back" role="doc-backlink">↩︎</a></p></li>
</ol>
</section>
    </section>
    <section class="author">
        <div class="image-container">
            <img src="https://asciijungle.com/images/author.jpg" alt="Portrait of the blog's author. Dude with full beard and short hair.">
        </div>
        <div class="about">
            <span><b>Author: Benjamin Brunzel</b></span>
            <span>I'm a software engineer based in Weilheim i.Ob., Germany.</span>
            <span>If you want to get in touch <a href="https://norden.social/@asciijungle"> contact me in the fediverse</a></span>
        </div>
    </section>
    
</article>
]]></summary>
</entry>
<entry>
    <title>Making wlsunset take Effect for a Locked Screen on Sway</title>
    <link href="https://asciijungle.com/posts/2026-10-18-wlsunset-after-screen-off.html" />
    <id>https://asciijungle.com/posts/2026-10-18-wlsunset-after-screen-off.html</id>
    <published>2026-10-18T00:00:00Z</published>
    <updated>2026-10-18T00:00:00Z</updated>
    <summary type="html"><![CDATA[<article>
    <header>
        <h1>Making wlsunset take Effect for a Locked Screen on Sway</h1>
        <section class="date">
            Posted on 2026-10-18
            
        </section>
        <section class="tldr">
            <div>TL;DR</div>
            <span>wlsunset did not set the correct color temperature for my screens when they were switched off during sunset. This is how I fixed it by restarting it from swayidle's resume command. Bonus: A second press of the lock key turns the screens off on demand.</span>
        </section>
    </header>
    <section>
        <p>I’ve been using tiling window managers for way over a decade now. As a long time user of Xmonad on Xorg I switched to sway to be able to use the more modern Wayland based Desktop. On Xmonad I loved redshift, a program that adjusts the color temperature of the display in order to have a warmer display with less blue light during at night time.</p>
<p>On sway there is an alternative: <a href="https://git.sr.ht/~kennylevinsen/wlsunset">wlsunset</a>. It works basically the same. It’s a background program that I started in my sway config on startup of the desktop session.</p>
<p>But I noticed an issue with this setup: when I lock the screen before sunset and the monitors get switched off while I’m away, the screens are still cold when I wake up my monitors. The wlsunset process is running, and its log even says <code>setting temperature to 4000 K</code>. But the tint is just not being visible.</p>
<h2 id="cause-of-the-problem">Cause of the Problem</h2>
<p>wlsunset only talks to the compositor when it wants to change the temperature. During sunset that is every few seconds but after dusk the warmest value is reached and no changes are applied anymore. If the outputs are powered off while the last steps happen, nothing ever applies the final value.</p>
<h2 id="the-fix-i-found">The fix I found</h2>
<p>Restarting wlsunset applies the current temperature right away. So I wake it up whenever the screens come back on. I put the restart into a small script:</p>
<div class="sourceCode" id="cb1" data-org-language="sh"><pre class="sourceCode bash"><code class="sourceCode bash"><span id="cb1-1"><a href="#cb1-1" aria-hidden="true" tabindex="-1"></a><span class="co">#!/bin/sh</span></span>
<span id="cb1-2"><a href="#cb1-2" aria-hidden="true" tabindex="-1"></a><span class="ex">pkill</span> <span class="at">-x</span> wlsunset</span>
<span id="cb1-3"><a href="#cb1-3" aria-hidden="true" tabindex="-1"></a><span class="cf">while</span> <span class="ex">pgrep</span> <span class="at">-x</span> wlsunset <span class="op">&gt;</span>/dev/null<span class="kw">;</span> <span class="cf">do</span> <span class="fu">sleep</span> 0.1<span class="kw">;</span> <span class="cf">done</span></span>
<span id="cb1-4"><a href="#cb1-4" aria-hidden="true" tabindex="-1"></a><span class="ex">setsid</span> <span class="at">-f</span> wlsunset <span class="at">-T</span> 5500 <span class="at">-t</span> 4000 <span class="at">-l</span> 53.5 <span class="at">-L</span> 9.9</span></code></pre></div>
<p>The loop waits until the old process is gone. Then I start a new instance of wlsunset with the desired config<a href="#fn1" class="footnote-ref" id="fnref1" role="doc-noteref"><sup>1</sup></a>. If you’d want to use this for your setup just replace the coordinates with your own.</p>
<p>Killing a process and starting it again feels a bit dirty, but it is the best fix I found. If you can think of a better way I’d love to hear about that!</p>
<p>Then the script runs in two places: At startup it replaces the plain <code>exec wlsunset</code> line. Also it is called from the <code>resume</code> command of swayidle<a href="#fn2" class="footnote-ref" id="fnref2" role="doc-noteref"><sup>2</sup></a>. This is what the part of my sway config looks like:</p>
<div class="sourceCode" id="cb2"><pre class="sourceCode conf"><code class="sourceCode toml"><span id="cb2-1"><a href="#cb2-1" aria-hidden="true" tabindex="-1"></a><span class="dt">exec</span> <span class="dt">swayidle</span> <span class="dt">-w</span> <span class="dt">timeout</span> <span class="dt">300</span> <span class="dt">'swaymsg &quot;output * dpms off&quot;'</span> <span class="dt">resume</span> <span class="dt">'swaymsg &quot;output * dpms on&quot;; ~/.config/sway/wlsunset-restart'</span></span>
<span id="cb2-2"><a href="#cb2-2" aria-hidden="true" tabindex="-1"></a><span class="dt">exec</span> <span class="er">~/</span><span class="dt">.config</span><span class="er">/</span><span class="dt">sway</span><span class="er">/</span><span class="dt">wlsunset-restart</span></span></code></pre></div>
<p>After 300 seconds without input the screens go off. On the next key press or mouse movement they come back on and wlsunset is restarted.</p>
<h2 id="bonus-lock-and-switch-off-the-screens-with-one-key">Bonus: Lock and switch off the screens with one key</h2>
<p>While I was at it I tried to find a way to switch the screens off right after locking, because sometimes I know I’ll be away from the computer for longer and I don’t want to wait for the screen to switch off after the timeout.</p>
<p>swayidle enters its idle state immediately when it receives the <code>SIGUSR1</code> signal. That results in the same <code>dpms off</code> command being issued as caused by the timeout. The <code>resume</code> command takes care of waking everything up again in any case. The trick here is that sway lets you bind a key differently depending on whether a screen locker is running or not. That way a binding with the <code>--locked</code> flag<a href="#fn3" class="footnote-ref" id="fnref3" role="doc-noteref"><sup>3</sup></a> can be used while swaylock is active and the one without it in the other case.
In the sway configuration file this looks like that:</p>
<div class="sourceCode" id="cb3"><pre class="sourceCode conf"><code class="sourceCode toml"><span id="cb3-1"><a href="#cb3-1" aria-hidden="true" tabindex="-1"></a><span class="dt">set</span> <span class="er">$</span><span class="dt">locker</span> <span class="dt">'swaylock -f -c 000000 --inside-color 000000b3 -K'</span></span>
<span id="cb3-2"><a href="#cb3-2" aria-hidden="true" tabindex="-1"></a><span class="dt">bindsym</span> <span class="er">$</span><span class="dt">mod</span><span class="er">+</span><span class="dt">Shift</span><span class="er">+</span><span class="dt">z</span> <span class="dt">exec</span> <span class="er">$</span><span class="dt">locker</span></span>
<span id="cb3-3"><a href="#cb3-3" aria-hidden="true" tabindex="-1"></a><span class="dt">bindsym</span> <span class="dt">--locked</span> <span class="er">$</span><span class="dt">mod</span><span class="er">+</span><span class="dt">Shift</span><span class="er">+</span><span class="dt">z</span> <span class="dt">exec</span> <span class="dt">pkill</span> <span class="dt">-USR1</span> <span class="dt">-x</span> <span class="dt">swayidle</span></span></code></pre></div>
<p>So what does that do? I can simply press <code>$mod+Shift+z</code> once to lock my screen. The Displays stay powered and would switch off after the 300 second timeout. But when I press it again the screens go off immediately.
Any key press wakes them up with the tint intact. This is only one combination and I can even press it with one hand on my split keyboard. Neat!</p>
<h2 id="conclusion">Conclusion</h2>
<p>wlsunset itself does nothing wrong here. It just has no way to find out that the screens were switched off in between. Restarting it on resume is a cheap workaround that works for me. Maybe you are struggling with the same configuration issues.</p>
<p>Do you have a different solution for it? How does your sway configuration look like? I’d love to hear about it.</p>
<h2 id="footnotes">Footnotes</h2>
<section id="footnotes" class="footnotes footnotes-end-of-document" role="doc-endnotes">
<hr />
<ol>
<li id="fn1"><p><code>setsid -f</code> starts the command in a new session of its own, so it is detached from the script that launched it.<a href="#fnref1" class="footnote-back" role="doc-backlink">↩︎</a></p></li>
<li id="fn2"><p><a href="https://github.com/swaywm/swayidle">swayidle</a> is the idle management daemon for Wayland compositors like sway.<a href="#fnref2" class="footnote-back" role="doc-backlink">↩︎</a></p></li>
<li id="fn3"><p>By default sway does not trigger key bindings while a screen locker is active. The <code>--locked</code> flag makes a binding work anyway.<a href="#fnref3" class="footnote-back" role="doc-backlink">↩︎</a></p></li>
</ol>
</section>
    </section>
    <section class="author">
        <div class="image-container">
            <img src="https://asciijungle.com/images/author.jpg" alt="Portrait of the blog's author. Dude with full beard and short hair.">
        </div>
        <div class="about">
            <span><b>Author: Benjamin Brunzel</b></span>
            <span>I'm a software engineer based in Weilheim i.Ob., Germany.</span>
            <span>If you want to get in touch <a href="https://norden.social/@asciijungle"> contact me in the fediverse</a></span>
        </div>
    </section>
    
</article>
]]></summary>
</entry>
<entry>
    <title>Visualizing POTA Activations: Generating Azimuthal Maps from ADIF Logs</title>
    <link href="https://asciijungle.com/posts/2026-08-05-visualizing-pota-activations-azimuthal-maps-from-adif.html" />
    <id>https://asciijungle.com/posts/2026-08-05-visualizing-pota-activations-azimuthal-maps-from-adif.html</id>
    <published>2026-08-05T00:00:00Z</published>
    <updated>2026-08-05T00:00:00Z</updated>
    <summary type="html"><![CDATA[<article>
    <header>
        <h1>Visualizing POTA Activations: Generating Azimuthal Maps from ADIF Logs</h1>
        <section class="date">
            Posted on 2026-08-05
            
        </section>
        <section class="tldr">
            <div>TL;DR</div>
            <span>azi-qso-map is a ready to use Python tool to generate azimuthal equidistant maps from ADIF logfiles. It visualizes contacts, bands, and QSO rates for sharing POTA and contest activations on social media.</span>
        </section>
    </header>
    <section>
        <p>As an amateur radio operator I like to do “parks on the air” activations and operate out in the wild. Setting up the portable radio station in a park and operating using my voice for single side band or morse code for cw operation is just a real joy for up to a few hours.</p>
<p>After some activations I post about the activation over on mastodon. For that I would snap one or two pictures that show the setup and the location. To give a deeper insight into the particular activation I wanted to top that up with a summary of the contacts. At first, I just included a screenshot of the map view of my logging program (Wavelog<a href="#fn1" class="footnote-ref" id="fnref1" role="doc-noteref"><sup>1</sup></a>), like in <a href="https://norden.social/@asciijungle/113805182328662041">this early post</a>. That way people can see at a glance how many contacts I had, how far I reached and which countries I got in contact with.</p>
<p>That already gave an impression, but I wanted to convey even more information. The reader should get a better feeling on how far the contacts really were apart. They should get an idea of how many contacts were done on which band. To bring it even further, I wanted to show how my QSO<a href="#fn2" class="footnote-ref" id="fnref2" role="doc-noteref"><sup>2</sup></a> rates were on certain transmission modes or bands. All in all that should really give a rich picture how the radio conditions were on that day.</p>
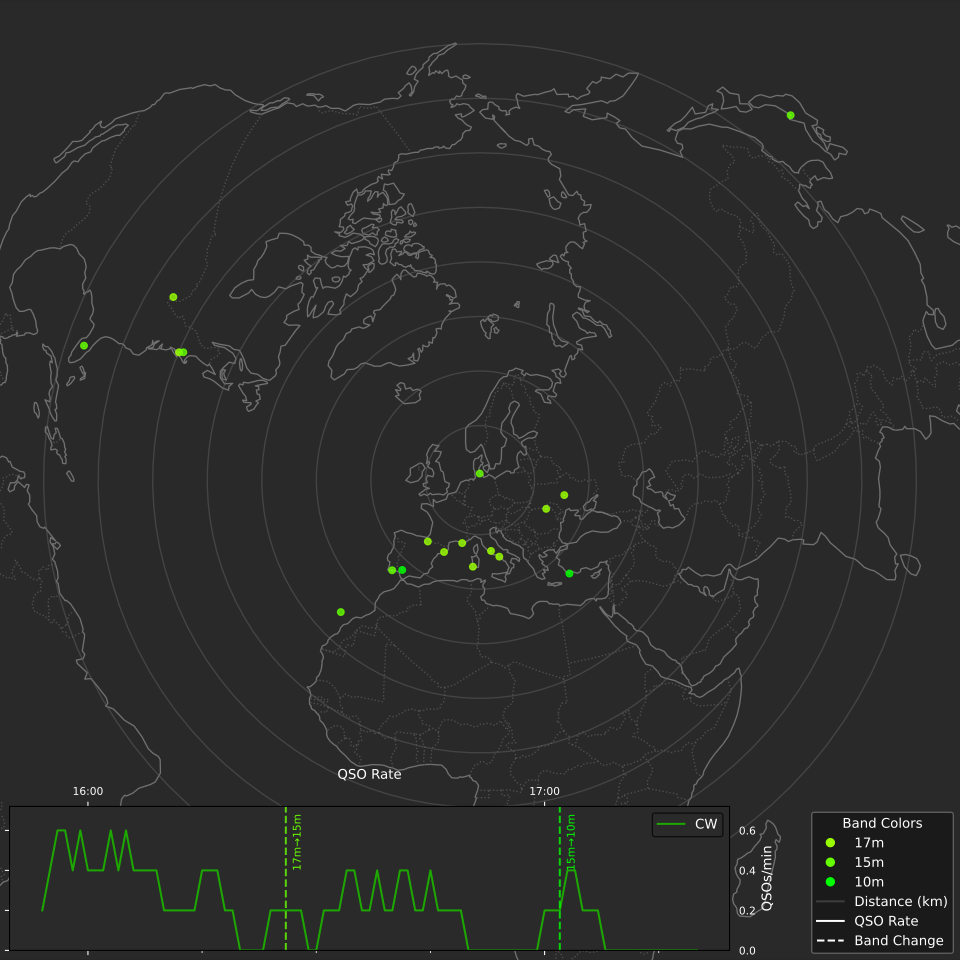
<p>So I came up with the idea of creating my own unique map design for sharing pictures of maps for amateur radio activations, like <a href="https://norden.social/@asciijungle/116636910806146920">this one</a>.</p>
<figure id="fig:azi-qso-map-example" alt="Azimuthal equidistant map centered on the operator location showing amateur radio contacts as colored dots with distance rings and a QSO rate graph in the lower left corner. There are contacts across Europe and into the US.">
<img src="https://asciijungle.com/images/azi-qso-map-example.png" />
<figcaption>Example activation map generated by <a href="https://codeberg.org/asciijungle/azi-qso-map">azi-qso-map</a> showing contacts on an azimuthal equidistant projection with QSO rate graph. This was an actual activation I did in Hamburg.</figcaption>
</figure>
<p>I was looking for libraries that I could use to accomplish what I wanted and settled for the Python ecosystem. The <a href="https://cartopy.readthedocs.io/stable/">cartopy</a> library provides an easy interface to render maps using different projections. It also comes with <code>cartopy.crs.AzimuthalEquidistant</code>, a map projection other than the Mercator projection that we all are used to from for example online map services.</p>
<h2 id="why-azimuthal-equidistant">Why Azimuthal Equidistant?</h2>
<p>It works like this: Imagine you’re standing in the middle of the map at your location, looking down. You flatten everything you see into a circle around you. On the map you are at the center. Distances in every direction from you are the same. If a contact is 2,000 km away in real life, it’s exactly twice as far from the center as one at 1,000 km. Lastly, if someone is northeast of you in reality, they’re northeast on the map too. That way you exactly see the contact on a line at the correct degree from your antenna. This is great for directional antennas as you will be able to see, for example, if all of your contacts are in a certain direction. It is pretty much what you would see on a radar screen.</p>
<p>There are some downsides as well. Shapes and areas get increasingly distorted the further you go from the center. Continents near the edges look stretched. The resulting map might look unfamiliar. For what I want to show in my map that projection is really nice though.</p>
<p>Cartopy supports taking the continent outlines from a public domain dataset and map it towards that projection. Those outlines are vector graphics so it is possible to export an <code>.svg</code> file in the end which scales nicely.</p>
<h2 id="putting-contacts-on-the-map">Putting Contacts on the Map</h2>
<p>Next I wanted to add the stations as colored dots onto the map. For that I take each contact’s maidenhead locator<a href="#fn3" class="footnote-ref" id="fnref3" role="doc-noteref"><sup>3</sup></a> from the ADIF<a href="#fn4" class="footnote-ref" id="fnref4" role="doc-noteref"><sup>4</sup></a> logfile of the activation. That gets converted to geographic coordinates which then can be put on the map by applying the projection. I can add additional information from the contact like for example the band that contact has been logged on and, depending on that, color the dot on the map accordingly.</p>
<h2 id="graphing-qso-rates">Graphing QSO Rates</h2>
<p>To be able to see how the activation progressed I added a graph showing logged contacts per minute in 5 minute windows. It highlights the different bands and modes for easy comparison.
The plot is done with <code>matplotlib</code>, a Python library that allows to plot different kind of data graphs.</p>
<p>The graph together with the map really tells the story of the activation. In the example shown above you’ll be able to analyze it like this. First you take a look at the map. You see contacts across Europe and some on the west coast of the US. That is not bad for a park activation so you dive deeper. Taking a look at the QSO rate you’ll see that all of the contacts were worked in CW, which is Morse code. There are three bands used in this activation. 17m, 15m and finally 10m. You see that the band changes occurred each time after a drop in the QSO rate. The activator worked each band until there were no more stations calling them, then switched to another band. You see they operated for about 1 and a half hours from 15:45 until about 17:30. See what I mean? A powerful visualization conveying a lot of information.</p>
<h2 id="try-it-yourself">Try it yourself</h2>
<p>I have received requests from multiple people asking how I created my shared maps so I have published my map tool as <a href="https://codeberg.org/asciijungle/azi-qso-map">azi-qso-map</a> on codeberg. Finally you’ll be able to just apply it directly to the .adif files of your last activation! The code is available under the MIT license. If you have feedback or want to report issues you can do so on codeberg. Installation and usage is described in the README.md on the project page. I would love to hear from you if you try it out. You can reach out via Mastodon.</p>
<h2 id="footnotes">Footnotes</h2>
<section id="footnotes" class="footnotes footnotes-end-of-document" role="doc-endnotes">
<hr />
<ol>
<li id="fn1"><p><a href="https://www.wavelog.org/">Wavelog</a> is an open source web-based amateur radio logbook application, accessible from anywhere via a browser.<a href="#fnref1" class="footnote-back" role="doc-backlink">↩︎</a></p></li>
<li id="fn2"><p>QSO stands for a two-way radio contact between amateur radio stations. The term comes from the Q code system used in radio communication.<a href="#fnref2" class="footnote-back" role="doc-backlink">↩︎</a></p></li>
<li id="fn3"><p>The Maidenhead Locator System is a geographic coordinate system used by amateur radio operators. It divides the world into grid squares identified by short alphanumeric codes like JO53ao.<a href="#fnref3" class="footnote-back" role="doc-backlink">↩︎</a></p></li>
<li id="fn4"><p>ADIF stands for Amateur Data Interchange Format, a standardized file format for exchanging amateur radio logbook data between different logging programs. It is the format being used to upload activations to activity programs like POTA or SOTA.<a href="#fnref4" class="footnote-back" role="doc-backlink">↩︎</a></p></li>
</ol>
</section>
    </section>
    <section class="author">
        <div class="image-container">
            <img src="https://asciijungle.com/images/author.jpg" alt="Portrait of the blog's author. Dude with full beard and short hair.">
        </div>
        <div class="about">
            <span><b>Author: Benjamin Brunzel</b></span>
            <span>I'm a software engineer based in Weilheim i.Ob., Germany.</span>
            <span>If you want to get in touch <a href="https://norden.social/@asciijungle"> contact me in the fediverse</a></span>
        </div>
    </section>
    
</article>
]]></summary>
</entry>
<entry>
    <title>Learning Morse Code for Amateur Radio: From CW Course to 100 DXCC Entities</title>
    <link href="https://asciijungle.com/posts/2026-07-23-how-i-learned-cw.html" />
    <id>https://asciijungle.com/posts/2026-07-23-how-i-learned-cw.html</id>
    <published>2026-07-23T00:00:00Z</published>
    <updated>2026-07-23T00:00:00Z</updated>
    <summary type="html"><![CDATA[<article>
    <header>
        <h1>Learning Morse Code for Amateur Radio: From CW Course to 100 DXCC Entities</h1>
        <section class="date">
            Posted on 2026-07-23
            
        </section>
        <section class="tldr">
            <div>TL;DR</div>
            <span>I spent a year learning Morse code in a weekly CW course. What started with copying characters on paper turned into park activations, contest operation, and 100 DXCC entities confirmed using radiotelegraphy.</span>
        </section>
    </header>
    <section>
        <p>When I started my amateur radio classes in 2022 and started to hang out with fellow radio operators, it did not take long before I heard people talk about using telegraphy with Morse code to communicate via amateur radio. At first I wondered, why would people invest a substantial amount of time learning to send and decode Morse signals without any aid of technical devices?</p>
<p>In fact, there are several reasons why people still use this first of all modes. One reason is that apparently the signal to noise ratio is higher when compared to a voice signal in single sideband (SSB). That means your signal can reach stations further away when sent with the same power using Morse code. Quite a good reason.
Secondly, the mode is very flexible. You can have very short contest style QSOs<a href="#fn1" class="footnote-ref" id="fnref1" role="doc-noteref"><sup>1</sup></a> but also use it for conversational contacts.</p>
<h3 id="the-course">The Course</h3>
<p>There are even more reasons to learn and use it, so I was interested in learning CW<a href="#fn2" class="footnote-ref" id="fnref2" role="doc-noteref"><sup>2</sup></a> and participated in my local club’s CW course in 2024. The teacher was Edmund Ramm, DJ6UX, a very good operator with many years of operation as well as teaching practice. He has taught many operators over the years and his course evolved from in person to online in the recent years.</p>
<p>We used Mumble<a href="#fn3" class="footnote-ref" id="fnref3" role="doc-noteref"><sup>3</sup></a> to receive and send the code along with voice over the internet. We would meet every Friday evening online for two hours and receive groups of five characters out of the already learned characters. We had to copy them down to paper and read them back. If we made a mistake we would get the same group of five characters sent again until we got it right. If the group was correct we would receive an `r` and the next student continued with the next group of five.</p>
<p>Every week there were new characters joining in, so we had to prepare by practicing daily for at least 15 minutes.
This is the list of new characters in each week:</p>
<pre><code>KW40: A,Q,S
KW41: T,2
KW42: C,O
KW43: D,5,/
KW44: I,R,9
KW45: G,X
KW46: F,4
KW47: repeat
KW48: N,U,7
KW49: H,,
KW50: =,.
KW51: B,K
KW52: P,3
KW01: M,Y
KW02: J,W,Z
KW03: 1,6
KW04: 8,?
</code></pre>
<p>Only once we had learned to receive all the signs we would start sending them. Every participant had a Junker Straight key and would send groups of 5 chars off of a sheet of paper to the others just like Eddi had done before.
A pretty straightforward and effective method. But one that requires patience and persistence. Forget or neglect your practice in one week and you’ll have a hard time in the upcoming weeks. By learning in a group I felt a motivation that helped staying on board. And after some time I really wanted to make it and be able to use CW for radio contacts as I had already invested quite some time.
In total, the course took a whole year. After we were done learning to send and receive we invested the remaining weeks to practice gaining more speed (up to 15wpm) and to acquire rudimentary head copy<a href="#fn4" class="footnote-ref" id="fnref4" role="doc-noteref"><sup>4</sup></a> skills. A year might seem very long but all this takes a lot of time and practice.</p>
<p>The most challenging part for me was to allocate time for the course on Friday evenings. I was used to using that time to socialize, meet friends, go out and so on. It was very challenging to always stay strong and prioritize the cw course above all else. Some weeks I struggled. It felt like with every new character I had to also relearn the others to some degree. But slowly I gained more and more confidence. To me it felt most effective to spread the daily practice time across the day. Having short sessions in the morning, lunch time, and evening yielded better results than having one longer session.</p>
<h3 id="making-first-contact">Making First Contact</h3>
<p>By the end of January 2025, a few others from the course and I tried to see if we could receive each others signals on the 2m band within Hamburg. What started as a test became my first Morse code radio contact, my first CW QSO. Many people have very vivid memory of their first CW QSO. To me I was a bit surprised but I knew what to expect so it felt more like the natural next step than a big revolution. It was not long before I started to also have my first QSOs on the short wave frequencies.</p>
<h3 id="first-park-activation">First Park Activation</h3>
<p>Two weeks after that, I went for my first Parks on the Air<a href="#fn5" class="footnote-ref" id="fnref5" role="doc-noteref"><sup>5</sup></a> activation in CW. 11 QSOs with a relative straightforward exchange, however when calling CQ you have to be able to directly respond to an unknown callsign which was quite challenging at first. You do not have to be perfect though, just get the first few letters and add a question mark and they’ll send it again for you. To me this first small POTA pileup in CW and handling it was the real tipping point. In the first QSO I knew the other operator and it was kind of like online but having natural static and fading on the signals on the short wave really was something totally new. From this moment on I just wanted to work more stations from various countries. The time invested had paid off.</p>
<h3 id="field-day">Field Day</h3>
<p>We continued with the course and during the first weekend in June a few operators from the local club and I participated in the IARU Region 1 field day in CW as DL0AT/P. It was quite hard for me to copy at the higher speeds. The weather was cold and rainy. We had issues with too much wind on our antenna. We organized in teams of two operators and took shifts of one to three hours each. It was good to have another operator listening next to me when I was having issues with the call signs. Together as a team we managed to get a few hundred QSOs into the log.</p>
<h3 id="the-exam">The Exam</h3>
<p>In the summer on August 11th I took my official Morse code exam at the Bundesnetzagentur<a href="#fn6" class="footnote-ref" id="fnref6" role="doc-noteref"><sup>6</sup></a>. This is an optional added exam that officially certifies that the operator is able to send and receive Morse code at 12 words per minute. An operator that passed the exam would get a remark in his official license document. To officially prove that you are capable of Morse code operation is required to operate in some countries. However, I took that exam mainly just for me. Having an official verification to be a Morse code operator is a nice feeling.</p>
<h3 id="contest-operation-from-home">Contest Operation from Home</h3>
<p>In October that year I then worked my first contest from home. The Worked All Germany Contest wich yielded quite some QSOs despite the local noise at my station. For this I had to set up some contest logging software and configure the interface with my transceiver so the logbook could pull the frequency and band information from there. My strategy back then: I only worked search and pounce<a href="#fn7" class="footnote-ref" id="fnref7" role="doc-noteref"><sup>7</sup></a> style. That way I had enough time to copy down the callsign of the station running on the frequency and also the sequential number they were giving out. That was challenging because of heavy QRM<a href="#fn8" class="footnote-ref" id="fnref8" role="doc-noteref"><sup>8</sup></a> and the higher speeds I was not yet used to at the time.</p>
<p>Since then, I have activated many parks, taken part in multiple contests and had a lot of conversational contacts using Morse code. My speed improved to about 18 words per minute. And not long ago I got confirmation of my 100th DXCC<a href="#fn9" class="footnote-ref" id="fnref9" role="doc-noteref"><sup>9</sup></a> entry worked in CW according to Logbook of The World<a href="#fn10" class="footnote-ref" id="fnref10" role="doc-noteref"><sup>10</sup></a>.</p>
<h3 id="start-your-own-cw-endeavor">Start your own CW Endeavor</h3>
<p>If you want to get into CW using Morse code and wonder if it is worth the effort I’d encourage you it is really fun and nerdy and lets you experience the early days of radio communication. You can build your own CW transceiver, get nice results using only a few watts of transmission power. You can reach more amateur radio operators as there are a few that only ever work in cw.</p>
<p>If you cannot or do not want to participate in a course like mine, the method that I used to learn the code can also be followed all by yourself. There are awesome tools like the website <a href="https://lcwo.net">Learn CW Online</a> that are available for free. For me however it was crucial to have a group to learn with. The regular classes at a certain point in time made it important to practice every day and in the end kept me going. If you can I’d recommend you also join a group or course to keep up the motivation over several months. In the end it will be worth it. My Morse buddy Peter (DL6PL) who participated in the same course as me also really motivated me to keep at it. The community and the shared experiences are what amateur radio is all about. It feels nice to share the challenge of learning Morse code with others. CW operators are forming another layer of community inside of the hobby. All of them have invested the time to get to the point where they can use the skill to have contacts with others. The conversation partners value that which makes it much more valuable than contacts in many other operation modes.</p>
<p>Looking back, now I truly understand why it is worth spending a substantial amount of time learning how to use Morse code for amateur radio contacts. Now go and start your CW endeavor.</p>
<h2 id="footnotes">Footnotes</h2>
<section id="footnotes" class="footnotes footnotes-end-of-document" role="doc-endnotes">
<hr />
<ol>
<li id="fn1"><p>A QSO is a two-way radio contact between stations. The term comes from the Q-code system used in radiotelegraphy.<a href="#fnref1" class="footnote-back" role="doc-backlink">↩︎</a></p></li>
<li id="fn2"><p>CW stands for Continuous Wave, the technical term for Morse code transmission in amateur radio.<a href="#fnref2" class="footnote-back" role="doc-backlink">↩︎</a></p></li>
<li id="fn3"><p><a href="https://mumble.info">Mumble</a> is a voice over IP service that is published under an open source license. Its client-server architecture supports group chats. That is what we used in the course.<a href="#fnref3" class="footnote-back" role="doc-backlink">↩︎</a></p></li>
<li id="fn4"><p>Head copy means decoding Morse code mentally without writing down each character, understanding the message directly as one would understand spoken language.<a href="#fnref4" class="footnote-back" role="doc-backlink">↩︎</a></p></li>
<li id="fn5"><p><a href="https://pota.app">Parks on the Air (POTA)</a> is a program where amateur radio operators set up portable stations in public parks and make contacts with other operators.<a href="#fnref5" class="footnote-back" role="doc-backlink">↩︎</a></p></li>
<li id="fn6"><p>The Bundesnetzagentur is the German Federal Network Agency, responsible for telecommunications regulation including amateur radio licensing and examinations.<a href="#fnref6" class="footnote-back" role="doc-backlink">↩︎</a></p></li>
<li id="fn7"><p>Search and pounce means tuning across the band looking for stations calling CQ and then responding to them. The alternative is running, where the operator stays on one frequency and calls CQ continuously.<a href="#fnref7" class="footnote-back" role="doc-backlink">↩︎</a></p></li>
<li id="fn8"><p>QRM is a Q-code abbreviation meaning man-made interference from other radio stations on nearby frequencies.<a href="#fnref8" class="footnote-back" role="doc-backlink">↩︎</a></p></li>
<li id="fn9"><p>DXCC stands for DX Century Club, an award for confirming contacts with 100 or more different countries or entities. It is one of the most recognized achievements in amateur radio.<a href="#fnref9" class="footnote-back" role="doc-backlink">↩︎</a></p></li>
<li id="fn10"><p><a href="https://lotw.arrl.org">Logbook of The World (LoTW)</a> is a digital contact confirmation system operated by the ARRL, where both parties upload their log entries and the system automatically matches and confirms contacts.<a href="#fnref10" class="footnote-back" role="doc-backlink">↩︎</a></p></li>
</ol>
</section>
    </section>
    <section class="author">
        <div class="image-container">
            <img src="https://asciijungle.com/images/author.jpg" alt="Portrait of the blog's author. Dude with full beard and short hair.">
        </div>
        <div class="about">
            <span><b>Author: Benjamin Brunzel</b></span>
            <span>I'm a software engineer based in Weilheim i.Ob., Germany.</span>
            <span>If you want to get in touch <a href="https://norden.social/@asciijungle"> contact me in the fediverse</a></span>
        </div>
    </section>
    
</article>
]]></summary>
</entry>
<entry>
    <title>CQ WPX SSB Contest 2026: Working All Continents and VK6 on the Long Path</title>
    <link href="https://asciijungle.com/posts/2026-03-30-participating-in-cq-ww-wpx-contest-ssb.html" />
    <id>https://asciijungle.com/posts/2026-03-30-participating-in-cq-ww-wpx-contest-ssb.html</id>
    <published>2026-03-30T00:00:00Z</published>
    <updated>2026-03-30T00:00:00Z</updated>
    <summary type="html"><![CDATA[<article>
    <header>
        <h1>CQ WPX SSB Contest 2026: Working All Continents and VK6 on the Long Path</h1>
        <section class="date">
            Posted on 2026-03-30
            
        </section>
        <section class="tldr">
            <div>TL;DR</div>
            <span>Amateur Radio contest report: Great propagation, 256 QSOs, 27 new DXCCs, and an epic 26,000 km long-path contact with VK6 Australia during grayline on 20m. My first major SSB contest delivered beyond expectations.</span>
        </section>
    </header>
    <section>
        <p>After participating in several amateur radio contests in telegraphy last year, I wanted to also take part in a phone contest. The amateur radio operators call that SSB which stands for single sideband. It is the most common analogue voice transmission mode.
I still consider myself to be a contest rookie - this was only my sixth contest and the first time operating SSB during a major contest.</p>
<p>For this contest I was able to use the big station of my local amateur radio club. That enabled me to work in the High Power category and use the three element yagi for the 20, 15 and 10 meter bands. For me it is an exciting station as I cannot really raise antennas at home.</p>
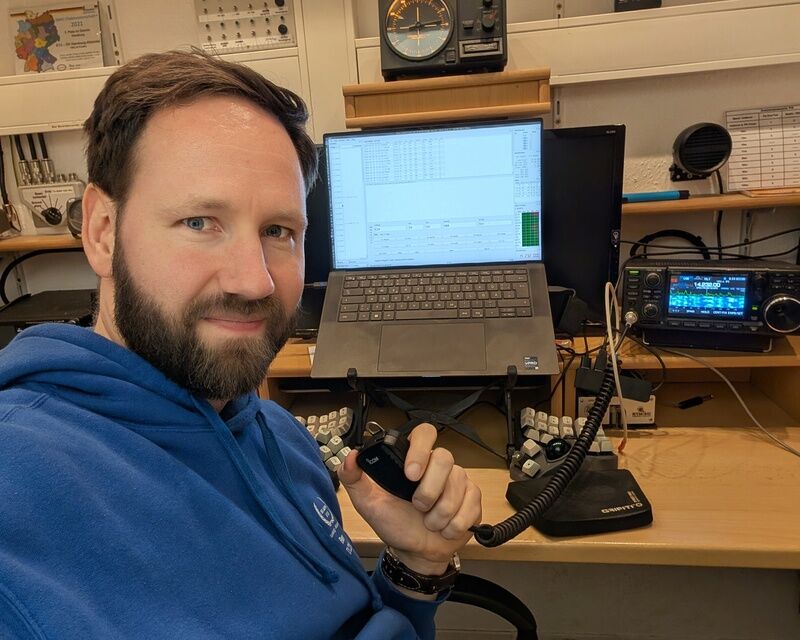
<figure id="fig:operator-selfie" alt="Photograph of the operator sitting in front of the transceiver in the shack of the amateur radio club station. He is holding a hand microphone and is wearing a blue sweater.">
<img src="https://asciijungle.com/images/c207c240-80cc-4ad1-8742-c1a539d368ac.jpg" />
<figcaption>Selfie of the operator in the club station.</figcaption>
</figure>
<h2 id="my-goals-for-the-contest">My Goals for the Contest</h2>
<p>Before the contest I sat down and thought about my goals for the contest. I wanted to only work a couple of hours but make the best out of it.
For the Two Modes Award from the DIG I was lacking SSB contacts with south america and oceania that are confirmed by QSL Cards<a href="#fn1" class="footnote-ref" id="fnref1" role="doc-noteref"><sup>1</sup></a> or via Logbook of the World<a href="#fn2" class="footnote-ref" id="fnref2" role="doc-noteref"><sup>2</sup></a>.
So I set it as my goal to get at least one confirmation from both of these continents. Confirmations from stations in countries I have not yet worked, so called DXCCs<a href="#fn3" class="footnote-ref" id="fnref3" role="doc-noteref"><sup>3</sup></a>, would also be nice but were not a primary goal. As for my placement in the contest the goal is to not be the last station in my category.</p>
<h2 id="making-a-plan-for-the-weekend">Making a Plan for the Weekend</h2>
<p>Having these goals in mind I planned my contest weekend. I’d start on Saturday after noon, take the bus to the club station and setup my Linux logging PC. During the afternoon I would try to work south America. In the evening I would try working stations on the low bands, knowing that the low band antennas are not the strength of the station.
Then I’d call it a day go home and get some sleep.</p>
<p>On Sunday I would get up early to start operation around 6:00 UTC and try to catch Oceania and some asia. Around noon I’d call it a day and have the rest of the day to recover.</p>
<h2 id="report-from-saturday">Report from Saturday</h2>
<p>I arrived as planned and had the station ready to log the first QSO<a href="#fn4" class="footnote-ref" id="fnref4" role="doc-noteref"><sup>4</sup></a> at 12:23 UTC<a href="#fn5" class="footnote-ref" id="fnref5" role="doc-noteref"><sup>5</sup></a>. After checking the first QSOs on 40m I jumped onto the 15m band turned the beam to south America and directly worked P45A in Aruba.</p>
<p>At 12:57 UTC, I switched to 10m, turned the beam to 240°, and immediately heard PY2KQ calling. That was the moment - South America was wide open. Over the following 36 minutes, the band delivered: PY2KQ, PY2MP, PY2WB, and PY2UD from Brazil, then LU2FE from Argentina. I was surprised by how good the propagation on 10m was. With a solar flux index of over 160 after it had been below 150 for weeks the conditions were awesome. On 10m there was barely any QRM noticeable. Times like these are really the fun of being an amateur radio operator.</p>
<p>After I had worked the bands front to back and had my goal for south America already achieved, I took a look to the cluster. I tried to spot some stations from new to me DXCCs. Cape Verde was exceptionally active with three different D4 stations worked. Indonesia (YB) gave me a backup for Oceania, just in case I would not be able to work Australia on Sunday.</p>
<figure id="fig:qso-rates-saturday" alt="QSO rate graph for Saturday March 28, 2026, showing contacts per minute over time from 12:23 to 22:09 UTC with colored background indicating band usage">
<img src="https://asciijungle.com/images/saturday_session.svg" />
<figcaption>QSO rate throughout Saturday session showing the South America opening around 13:00 UTC and the best hour on 80m at 21:00 UTC</figcaption>
</figure>
<p>As the afternoon wore on, the 20m band gave me multiple north American stations but also Europe and even China and Indonesia. As I was sure at least one of the Indonesian stations would confirm the contact with QSL I had my goals already achieved on Saturday evening!</p>
<p>As darkness fell, I moved down to 40m and then 80m. This turned out to be the fastest part of the contest - 80m was absolutely packed with European stations, and I logged 33 contacts in 40 minutes. There was much QRM<a href="#fn6" class="footnote-ref" id="fnref6" role="doc-noteref"><sup>6</sup></a> on 40 and 80 though which made it really tough to hear the stations.</p>
<p>With all my goals achieved and a bunch of new DXCCs in the log, I packed up and headed home at 22:09 UTC for a short night’s sleep. The clock would jump forward an hour as we slid into summer time and that would cost me another hour of sleep.</p>
<h2 id="early-start-on-sunday">Early Start on Sunday</h2>
<p>On Sunday I jumped on the early bus and logged my first QSO at 05:48 UTC.
That day started much slower as there were only a few stations calling in the morning. I checked 15m but went back to 20 as there was not much going on at that early time.
After some time I was able to work south Korea, Kyrgyzstan, Kazakhstan, and Japan.</p>
<h2 id="the-highlight-of-the-contest">The Highlight of the Contest</h2>
<p>Still no Australia so I had the idea to try 20m on the long path. My beam was pointed west at 290° and heard VK6NC loud and clear. I called, and they came back!</p>
<p>This was my moment of the weekend. I finally had Australia in the log. It was my 234th QSO of the contest, and probably the most satisfying. Taking advantage of them being in the grayline during their sun set, the contact was made on the long path - roughly 26,000 kilometers going west through the Atlantic and Americas, rather than the shorter 14,000 km path through Asia.</p>
<p>After this contact I had to take a short break. There are not many moments like this.</p>
<figure id="fig:qso-rates-sunday" alt="QSO rate graph for Sunday March 29, 2026, showing contacts per minute over time from 05:48 to 10:37 UTC with the VK6 long-path contact visible">
<img src="https://asciijungle.com/images/sunday_session.svg" />
<figcaption>QSO rate on Sunday showing slower morning start and the VK6NC contact at 09:07 UTC on 20m</figcaption>
</figure>
<p>For the final stretch, I returned to 10m to sweep up any remaining remote stations. The last 40 minutes yielded some fantastic catches: Namibia, Bangladesh, and HC8NA from the Galapagos Islands!</p>
<p>After that I was extremely exhausted and called it a day at 10:37 UTC.</p>
<h2 id="conclusion">Conclusion</h2>
<p>Next time I would probably not start this early on Sunday as the first hours were a bit of a slow start. I could have instead used some more night time on the low bands.</p>
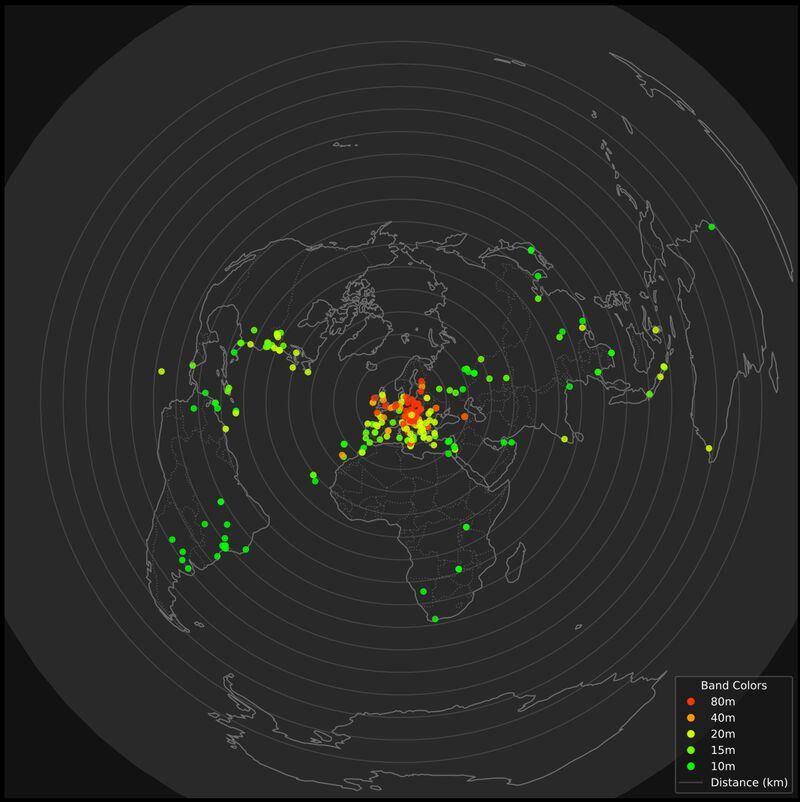
<figure id="fig:qso-map-of-the-contest" alt="map with amateur radio contacts centered on hamburg, Germany. There are contacts on all continents on it.">
<img src="https://asciijungle.com/images/dl2xu-cq-wpx-ssb-2026.jpg" />
<figcaption>All contest qsos on an azimutal projected map of the world. The color of the dot represents the amateur radio band the contact was made on.</figcaption>
</figure>
<p>I would not have thought that this contest would be that successful that made me really happy. Not only did I work the desired contacts with south America and Oceania, but I also managed to work 27 new DXCCs in SSB and 13 new ones regarding all modes. As we are on the decline of Solar Cycle #25 it was awesome to get to work a contest with stellar conditions once more. The 20 hours of operation time during the contest were more than expected. They yielded 256 QSOs in total. And I can tell that by now I have gotten the missing QSLs so I’ll get my “Two Modes Award”! In the end I’m really thankful for the experience of working an SSB contest at a very capable station.</p>
<h2 id="footnotes">Footnotes</h2>
<section id="footnotes" class="footnotes footnotes-end-of-document" role="doc-endnotes">
<hr />
<ol>
<li id="fn1"><p><a href="https://en.wikipedia.org/wiki/QSL_card">QSL Cards</a> are written confirmations of radio contacts, traditionally exchanged between amateur radio operators as proof of communication.<a href="#fnref1" class="footnote-back" role="doc-backlink">↩︎</a></p></li>
<li id="fn2"><p><a href="https://lotw.arrl.org/">Logbook of the World</a> is an electronic QSL card system maintained by the American Radio Relay League for confirming contacts over the internet.<a href="#fnref2" class="footnote-back" role="doc-backlink">↩︎</a></p></li>
<li id="fn3"><p>DXCC stands for <a href="https://www.arrl.org/dxcc">DX Century Club</a>, an amateur radio award program where operators collect confirmations from different countries and territories. Each country that got assigned an DXCC country code is just called “a DXCC” in amateur radio jargon.<a href="#fnref3" class="footnote-back" role="doc-backlink">↩︎</a></p></li>
<li id="fn4"><p>QSO stands for a two-way radio contact between amateur radio stations. The term comes from the Q code system used in radio communication.<a href="#fnref4" class="footnote-back" role="doc-backlink">↩︎</a></p></li>
<li id="fn5"><p>UTC stands for <a href="https://en.wikipedia.org/wiki/Coordinated_Universal_Time">Coordinated Universal Time</a>, the time standard used worldwide for radio communications to avoid timezone confusion.<a href="#fnref5" class="footnote-back" role="doc-backlink">↩︎</a></p></li>
<li id="fn6"><p>QRM refers to man-made radio interference from other stations or electrical devices.<a href="#fnref6" class="footnote-back" role="doc-backlink">↩︎</a></p></li>
</ol>
</section>
    </section>
    <section class="author">
        <div class="image-container">
            <img src="https://asciijungle.com/images/author.jpg" alt="Portrait of the blog's author. Dude with full beard and short hair.">
        </div>
        <div class="about">
            <span><b>Author: Benjamin Brunzel</b></span>
            <span>I'm a software engineer based in Weilheim i.Ob., Germany.</span>
            <span>If you want to get in touch <a href="https://norden.social/@asciijungle"> contact me in the fediverse</a></span>
        </div>
    </section>
    
</article>
]]></summary>
</entry>
<entry>
    <title>Archiving Personal Photos Offline: A Complete M-Disk Workflow</title>
    <link href="https://asciijungle.com/posts/2026-03-02-archive-photos-mdisk-bluray.html" />
    <id>https://asciijungle.com/posts/2026-03-02-archive-photos-mdisk-bluray.html</id>
    <published>2026-03-02T00:00:00Z</published>
    <updated>2026-03-02T00:00:00Z</updated>
    <summary type="html"><![CDATA[<article>
    <header>
        <h1>Archiving Personal Photos Offline: A Complete M-Disk Workflow</h1>
        <section class="date">
            Posted on 2026-03-02
            
        </section>
        <section class="tldr">
            <div>TL;DR</div>
            <span>I've built a photo archive on M-Disk Blu-rays using open source command line tooling like par2, and SHA256 verification. Offline, redundant, and designed to last decades without cloud subscriptions.</span>
        </section>
    </header>
    <section>
        <p>Everyone has personal data that is worth archiving. Data that does not change, that is not accessed all the time but data that you want to access in the future.
There are different solutions to this problem. Here I’ll show you how I archive my photo collection.</p>
<p>Over the years I have collected quite a number of personal photos. I wanted a way to store them safely to have them available for many years to come. Most people use a photo service that promises to store pictures for a monthly fee in their cloud. At first their prices are quite appealing but over the time as you use more and more storage and as you have to pay each month it becomes more and more unattractive. That is the reason I want to store the data on physical media in my control.</p>
<h2 id="physical-storage-options">Physical Storage Options</h2>
<p>There are different options for storing larger amounts of Data on physical media. For me it is important to store the data for a long time without having to copy it, refresh it or renew the physical media every now and then. I want the data to be stored offline, that means I do not want to use for example an network attached storage device that has to be plugged in.
The last criterion of importance to me was a format that has sufficient relevance, so there is a high likelihood that devices capable of reading it will be available in the future.</p>
<h2 id="m-disk-standard">M-Disk Standard</h2>
<p>For now I went with <a href="https://en.wikipedia.org/wiki/M-DISC">M-Disk</a>. That is a disk technology compatible with the DVD or Blu-ray standard. They use a glassy carbon material instead of the organic material that is commonly used in DVDs and Blu-rays. That’s why they claim they have a longer lifetime of several hundred years. Of course there is no way to find out how long they live since they only have been around for a few years by now. However there have been several tests by different entities that suggest a longer lifetime than regular blu-rays.</p>
<p>M-Disks exist in different storage sizes: DVD with 4,7 GB, Blu-ray with 25 GB and Blu-ray XL with up to 128 GB of storage. Depending on the amount of data to archive that may be a lot of disks. I went with the regular Blu-ray ones since it appears to be a good tradeoff between large enough storage and a widespread format that can be read by a lot of drives.
For the drives I won’t be recommending any devices. I’ve got an external USB Blu-ray writer that is capable of writing M-Disks.</p>
<h2 id="a-thought-about-encryption">A Thought about Encryption</h2>
<p>The content on a disc could be encrypted using different methods. I thought about this but decided against it. My personal photo collection is insensitive enough to be readable by anyone who can get their hands on the disks. Access Keys also need to be securely stored in a way that is different than the disks. If the keys are lost there is no way to restore the archive. That’s why for now I decided against encrypting the data on my disks.</p>
<h2 id="what-is-on-a-disk">What is on a Disk</h2>
<p>My disks currently follow a straight forward folder structure.</p>
<div class="sourceCode" id="cb1"><pre class="sourceCode txt"><code class="sourceCode default"><span id="cb1-1"><a href="#cb1-1" aria-hidden="true" tabindex="-1"></a>2026_PHOTOS_2022_0812</span>
<span id="cb1-2"><a href="#cb1-2" aria-hidden="true" tabindex="-1"></a>   ├── README.md</span>
<span id="cb1-3"><a href="#cb1-3" aria-hidden="true" tabindex="-1"></a>   ├── VERIFICATION.md</span>
<span id="cb1-4"><a href="#cb1-4" aria-hidden="true" tabindex="-1"></a>   ├── manifest.sha256</span>
<span id="cb1-5"><a href="#cb1-5" aria-hidden="true" tabindex="-1"></a>   ├── redundancy/</span>
<span id="cb1-6"><a href="#cb1-6" aria-hidden="true" tabindex="-1"></a>   └── CONTENT/</span></code></pre></div>
<p>The readme file contains information about the disk. This is primarily for myself if I’m accessing one of the discs in the future. Each disk gets a disk id that I assign to it which also goes into the readme. Here is an example of a readme file in one of my discs:</p>
<div class="sourceCode" id="cb2"><pre class="sourceCode markdown"><code class="sourceCode markdown"><span id="cb2-1"><a href="#cb2-1" aria-hidden="true" tabindex="-1"></a><span class="fu"># Archive Disk</span></span>
<span id="cb2-2"><a href="#cb2-2" aria-hidden="true" tabindex="-1"></a>Disc ID: 2026_PHOTOS_2022_0812</span>
<span id="cb2-3"><a href="#cb2-3" aria-hidden="true" tabindex="-1"></a></span>
<span id="cb2-4"><a href="#cb2-4" aria-hidden="true" tabindex="-1"></a>This data belongs to Benjamin Brunzel</span>
<span id="cb2-5"><a href="#cb2-5" aria-hidden="true" tabindex="-1"></a>E-Mail: b***@***.de</span>
<span id="cb2-6"><a href="#cb2-6" aria-hidden="true" tabindex="-1"></a>*Address goes here*</span>
<span id="cb2-7"><a href="#cb2-7" aria-hidden="true" tabindex="-1"></a></span>
<span id="cb2-8"><a href="#cb2-8" aria-hidden="true" tabindex="-1"></a><span class="fu">## Metadata</span></span>
<span id="cb2-9"><a href="#cb2-9" aria-hidden="true" tabindex="-1"></a>Created: 2026-01-09</span>
<span id="cb2-10"><a href="#cb2-10" aria-hidden="true" tabindex="-1"></a>Category: Photos</span>
<span id="cb2-11"><a href="#cb2-11" aria-hidden="true" tabindex="-1"></a>Content:</span>
<span id="cb2-12"><a href="#cb2-12" aria-hidden="true" tabindex="-1"></a><span class="ss"> - </span>Photos from 2022 August to December</span>
<span id="cb2-13"><a href="#cb2-13" aria-hidden="true" tabindex="-1"></a><span class="ss"> - </span>Includes hamburg, radtour</span>
<span id="cb2-14"><a href="#cb2-14" aria-hidden="true" tabindex="-1"></a>Size: 20GB</span>
<span id="cb2-15"><a href="#cb2-15" aria-hidden="true" tabindex="-1"></a></span>
<span id="cb2-16"><a href="#cb2-16" aria-hidden="true" tabindex="-1"></a><span class="fu">## Privacy / Usage Notice</span></span>
<span id="cb2-17"><a href="#cb2-17" aria-hidden="true" tabindex="-1"></a>These data contain personal and private content (photos, videos, documents).</span>
<span id="cb2-18"><a href="#cb2-18" aria-hidden="true" tabindex="-1"></a>They are intended for personal use only.</span>
<span id="cb2-19"><a href="#cb2-19" aria-hidden="true" tabindex="-1"></a></span>
<span id="cb2-20"><a href="#cb2-20" aria-hidden="true" tabindex="-1"></a>**It is strictly prohibited to copy, distribute, publish, or otherwise use the data without the explicit permission of the owners.**</span></code></pre></div>
<p>The verification file describes the verification process that can be used to check the integrity of the disk. This process will be described later.</p>
<p>The manifest file contains sha256 checksums for every file in the <code>CONTENT</code> folder. They allow for checking if a file can be correctly read from the archive. This is checked during verification.</p>
<p>The redundancy folder contains redundant parity data per top level folder in <code>CONTENT</code> This allows to reconstruct the data in case of losing data within the archive due to unreadable sectors. In my configuration I use 15% of redundancy. This means I can recover from up to 15% lost sectors. So if a disk only has 86% of readable sectors I’m theoretically able to restore the files without errors.</p>
<h2 id="creating-a-disk">Creating a Disk</h2>
<p>To create a disk I’m selecting which data goes onto it. I copy it to a directory on my linux machine that I want to use to burn the data to the disk. In that directory I create the target file structure as it should be found on the resulting disk. I have to make sure not to exceed 20GB of file size in <code>CONTENT</code> because I will add the 15% of redundancy that has to be accounted for.</p>
<p>After I’m fine with the contents that should go on my disk I create the sha256 checksums with the following command on the shell:</p>
<div class="sourceCode" id="cb3"><pre class="sourceCode bash"><code class="sourceCode bash"><span id="cb3-1"><a href="#cb3-1" aria-hidden="true" tabindex="-1"></a><span class="fu">find</span> ./CONTENT <span class="at">-type</span> f <span class="at">-print0</span> <span class="kw">|</span> <span class="fu">sort</span> <span class="at">-z</span> <span class="kw">|</span> <span class="fu">xargs</span> <span class="at">-0</span> sha256sum <span class="op">&gt;</span> manifest.sha256</span></code></pre></div>
<p>Next, I’m generating the redundancy using the <code>par2</code> program and move those files into the redundancy directory. It will generate multiple files for each folder in the top level of the <code>CONTENT</code> directory.</p>
<div class="sourceCode" id="cb4"><pre class="sourceCode bash"><code class="sourceCode bash"><span id="cb4-1"><a href="#cb4-1" aria-hidden="true" tabindex="-1"></a><span class="fu">mkdir</span> redundancy</span>
<span id="cb4-2"><a href="#cb4-2" aria-hidden="true" tabindex="-1"></a></span>
<span id="cb4-3"><a href="#cb4-3" aria-hidden="true" tabindex="-1"></a><span class="cf">for</span> dir <span class="kw">in</span> CONTENT/<span class="pp">*</span>/<span class="kw">;</span> <span class="cf">do</span></span>
<span id="cb4-4"><a href="#cb4-4" aria-hidden="true" tabindex="-1"></a>  <span class="cf">if</span> <span class="bu">[</span> <span class="ot">-d</span> <span class="st">&quot;</span><span class="va">$dir</span><span class="st">&quot;</span> <span class="bu">]</span><span class="kw">;</span> <span class="cf">then</span></span>
<span id="cb4-5"><a href="#cb4-5" aria-hidden="true" tabindex="-1"></a>    <span class="ex">par2</span> create <span class="at">-r15</span> <span class="at">-s4194304</span> <span class="st">&quot;</span><span class="va">$(</span><span class="fu">basename</span> <span class="st">&quot;</span><span class="va">$dir</span><span class="st">&quot;</span><span class="va">)</span><span class="st">.par2&quot;</span> <span class="va">$(</span><span class="fu">find</span> <span class="st">&quot;</span><span class="va">$dir</span><span class="st">&quot;</span> <span class="at">-type</span> f<span class="va">)</span></span>
<span id="cb4-6"><a href="#cb4-6" aria-hidden="true" tabindex="-1"></a>  <span class="cf">fi</span></span>
<span id="cb4-7"><a href="#cb4-7" aria-hidden="true" tabindex="-1"></a><span class="cf">done</span></span>
<span id="cb4-8"><a href="#cb4-8" aria-hidden="true" tabindex="-1"></a></span>
<span id="cb4-9"><a href="#cb4-9" aria-hidden="true" tabindex="-1"></a><span class="fu">mv</span> <span class="pp">*</span>.par2 redundancy</span></code></pre></div>
<p>Now the directory is ready to generate the universal disk format file system image that can be used to burn the resulting disk. We use this command:</p>
<div class="sourceCode" id="cb5"><pre class="sourceCode bash"><code class="sourceCode bash"><span id="cb5-1"><a href="#cb5-1" aria-hidden="true" tabindex="-1"></a><span class="ex">mkisofs</span> <span class="at">-udf</span> <span class="at">-r</span> <span class="at">-V</span> 2026_PHOTOS_2022_0812 <span class="at">-o</span> ../2026_PHOTOS_2022_0812.iso .</span></code></pre></div>
<p>You should check the filesize of the resulting iso file. It must not exceed 25 GB to fit onto a blu-ray.
Finally, I write the image onto a M-Disk using the <code>growisofs</code> command. Make sure you have your drive attached and an empty disk inserted. We will limit the writing speed to 4x which is reported to work better when writing M-Disk.</p>
<div class="sourceCode" id="cb6"><pre class="sourceCode bash"><code class="sourceCode bash"><span id="cb6-1"><a href="#cb6-1" aria-hidden="true" tabindex="-1"></a><span class="ex">growisofs</span> <span class="at">-dvd-compat</span> <span class="at">-speed</span><span class="op">=</span>4 <span class="at">-Z</span> /dev/sr0=2026_PHOTOS_2022_0812.iso</span></code></pre></div>
<p>Once this succeeds the data has been written to the disk. Now it’s time to verify the integrity of the disk we just created.</p>
<h2 id="verification-of-a-disk">Verification of a Disk</h2>
<p>This procedure will be conducted directly after creation of a new disk to make sure that the data on it can be relied on. After that it is recommended to verify stored disks every so often to ensure data remains to be readable. If you experience unreadable sectors you should still be able to restore all the data using the par2 parity data.</p>
<p>There are multiple steps to verification. First we’ll read all sectors of the disk printing an error in case there are any broken sectors.</p>
<div class="sourceCode" id="cb7"><pre class="sourceCode bash"><code class="sourceCode bash"><span id="cb7-1"><a href="#cb7-1" aria-hidden="true" tabindex="-1"></a><span class="fu">dd</span> if=/dev/sr0 of=/dev/null bs=2048 conv=noerror,sync status=progress</span></code></pre></div>
<p>In case of an error it would look like this: <code>dd: error reading '/dev/sr0': Input/output error</code>
Note that we are using the block size of 2048 as this is the standard block size for optical media.</p>
<p>If that command runs without any issues we continue with checking the checksums from the manifest file we’ve created earlier.</p>
<div class="sourceCode" id="cb8"><pre class="sourceCode bash"><code class="sourceCode bash"><span id="cb8-1"><a href="#cb8-1" aria-hidden="true" tabindex="-1"></a><span class="fu">sudo</span> mount /dev/sr0 /mnt</span>
<span id="cb8-2"><a href="#cb8-2" aria-hidden="true" tabindex="-1"></a><span class="bu">cd</span> /mnt</span>
<span id="cb8-3"><a href="#cb8-3" aria-hidden="true" tabindex="-1"></a><span class="fu">sha256sum</span> <span class="at">-c</span> manifest.sha256 <span class="dv">2</span><span class="op">&gt;&amp;</span><span class="dv">1</span> <span class="kw">|</span> <span class="fu">grep</span> <span class="at">-v</span> <span class="st">': OK$'</span></span></code></pre></div>
<p>This command checks all the files for their checksum in the manifest file. Only files that are not OK will be printed. If there is no output from this command everything is fine and the verification was successful. This process should be done every few years. I write down the verification result with date in the booklet of the disks enclosure. I’ve created over twenty disks by now and so far none of them had any issues during creation and verification.</p>
<h2 id="storage-of-the-disks">Storage of the Disks</h2>
<p>The Disks should be stored in a dark and dry environment in vertical orientation. I write each iso twice and store the disks in two different locations.</p>
<p>Let’s see how long this archive will hold up for me. So far all disks were without any errors. It is worth noting that writing disks and also the verification takes quite some time. If you have a lot of disks this becomes unbearable. Probably it would be an option to look into Blu-ray XL disks for larger data sets. For my personal archive I’ve not had any issue yet.</p>
<p>Are you archiving data? What is your approach? I’d like to hear about it.</p>
    </section>
    <section class="author">
        <div class="image-container">
            <img src="https://asciijungle.com/images/author.jpg" alt="Portrait of the blog's author. Dude with full beard and short hair.">
        </div>
        <div class="about">
            <span><b>Author: Benjamin Brunzel</b></span>
            <span>I'm a software engineer based in Weilheim i.Ob., Germany.</span>
            <span>If you want to get in touch <a href="https://norden.social/@asciijungle"> contact me in the fediverse</a></span>
        </div>
    </section>
    
</article>
]]></summary>
</entry>
<entry>
    <title>Building a LibreWolf Browser Setup with reasonable privacy and Vim Keybindings</title>
    <link href="https://asciijungle.com/posts/2026-02-19-browser-setup.html" />
    <id>https://asciijungle.com/posts/2026-02-19-browser-setup.html</id>
    <published>2026-02-19T00:00:00Z</published>
    <updated>2026-02-19T00:00:00Z</updated>
    <summary type="html"><![CDATA[<article>
    <header>
        <h1>Building a LibreWolf Browser Setup with reasonable privacy and Vim Keybindings</h1>
        <section class="date">
            Posted on 2026-02-19
            
        </section>
        <section class="tldr">
            <div>TL;DR</div>
            <span>A guide to setting up LibreWolf browser with Tridactyl vim keybindings and custom CSS for a privacy-focused, keyboard-driven browsing experience that maximizes screen space for content.</span>
        </section>
    </header>
    <section>
        <p>The web browser is one of the most important programs in my day-to-day work on the computer.
I want a browser setup that addresses a couple of goals. First I’d like to be independent of large corporations that try to observe my browsing behaviour for their profit. That is why I’d rather use an open source implementation instead of the various chrome based browsers. Since the servo browser<a href="#fn1" class="footnote-ref" id="fnref1" role="doc-noteref"><sup>1</sup></a> is not there yet<a href="#fn2" class="footnote-ref" id="fnref2" role="doc-noteref"><sup>2</sup></a>, a mozilla firefox based browser is the most viable option as of today.
Because Mozilla has started to put more and more questionable features into the firefox main release line, I was looking to try one of the open source forks promising more privacy. I need a reasonable tradeoff between privacy and ease of use. That is why I didn’t went with the tor browser providing the best privacy of the alternatives I looked at. I settled with the <a href="https://librewolf.net/">LibreWolf browser</a>.</p>
<p>The tiling window manager on my linux distribution can be completely managed from the keyboard without having to use the mouse. That is why I’d like to have improved keybindings for my browser as well. Since I’m using vim bindings for many of my other programs as well a vi plugin serves me very well in this regard. I added the <a href="https://addons.mozilla.org/en-US/firefox/addon/tridactyl-vim/">firefox extension Tridactyl</a> to LibreWolf.</p>
<p>Finally I also wanted to do some changes to the UI of the browser so the space used for the actual content of a webpage is maximized and it is not displaying active UI elements that I do not use.</p>
<figure id="fig:screenshot">
<img src="https://asciijungle.com/images/libreWolf-screnshot.png" />
<figcaption>Screenshot of my LibreWolf setup only showing a thin Adressbar on the top and no tablist or bookmark bar.</figcaption>
</figure>
<p>The result is a quite clean web browsing experience as can be seen on the screenshot above. It works nicely on large screens as well as smaller tiled areas as can be seen in the example.</p>
<h2 id="how-to-set-this-up">How to set this up</h2>
<p>I’m describing how to install the setup here so I can remember when moving to a different installation.
First you have to install the LibreWolf browser on your linux machine. The complete setup should in my eyes also work on MacOS or even Windows machines even though I have never tested it myself. The LibreWolf website describes the <a href="https://librewolf.net/installation/">installation for the various operating systems</a>.</p>
<p>After that you have to install the Tridactyl browser extension through the extension management in <code>about:addons</code>. Open that page in your browser, search for the plugin and apply it.
Once that is done I have opted for the default dark theme. This can be selected in <code>about:preferences</code>.
Next I wanted to hide the huge tab bar on the top of the browser. Tridactyle offers a tab list by pressing <code>b</code>, but I found that I do not use nearly as many open tabs at a time now that I use this extension<a href="#fn3" class="footnote-ref" id="fnref3" role="doc-noteref"><sup>3</sup></a>. This can be achieved by using a userChrome.css file<a href="#fn4" class="footnote-ref" id="fnref4" role="doc-noteref"><sup>4</sup></a>.
That file has to go into your browser profile directory which is located in your home config directory.</p>
<div class="sourceCode" id="cb1"><pre class="sourceCode css"><code class="sourceCode css"><span id="cb1-1"><a href="#cb1-1" aria-hidden="true" tabindex="-1"></a><span class="co">/* asciijungles's userChrome.css</span></span>
<span id="cb1-2"><a href="#cb1-2" aria-hidden="true" tabindex="-1"></a><span class="co"> * write to ~/.config/librewolf/librewolf/{yourProfile}/chrome/userChrome.css</span></span>
<span id="cb1-3"><a href="#cb1-3" aria-hidden="true" tabindex="-1"></a><span class="co"> */</span></span>
<span id="cb1-4"><a href="#cb1-4" aria-hidden="true" tabindex="-1"></a></span>
<span id="cb1-5"><a href="#cb1-5" aria-hidden="true" tabindex="-1"></a><span class="co">/* hide header tab bar */</span></span>
<span id="cb1-6"><a href="#cb1-6" aria-hidden="true" tabindex="-1"></a><span class="pp">#TabsToolbar</span> {</span>
<span id="cb1-7"><a href="#cb1-7" aria-hidden="true" tabindex="-1"></a>    <span class="kw">visibility</span><span class="ch">:</span> <span class="dv">collapse</span> <span class="at">!important</span><span class="op">;</span></span>
<span id="cb1-8"><a href="#cb1-8" aria-hidden="true" tabindex="-1"></a>}</span>
<span id="cb1-9"><a href="#cb1-9" aria-hidden="true" tabindex="-1"></a><span class="co">/* hide huge sidebar header*/</span></span>
<span id="cb1-10"><a href="#cb1-10" aria-hidden="true" tabindex="-1"></a><span class="pp">#sidebar-header</span><span class="op">,</span> <span class="pp">#search-box</span> {</span>
<span id="cb1-11"><a href="#cb1-11" aria-hidden="true" tabindex="-1"></a>    <span class="kw">display</span><span class="ch">:</span> <span class="dv">none</span><span class="at">!important</span><span class="op">;</span></span>
<span id="cb1-12"><a href="#cb1-12" aria-hidden="true" tabindex="-1"></a>}</span>
<span id="cb1-13"><a href="#cb1-13" aria-hidden="true" tabindex="-1"></a><span class="pp">#sidebar-header</span> {</span>
<span id="cb1-14"><a href="#cb1-14" aria-hidden="true" tabindex="-1"></a>    <span class="kw">display</span><span class="ch">:</span> <span class="dv">none</span> <span class="at">!important</span><span class="op">;</span></span>
<span id="cb1-15"><a href="#cb1-15" aria-hidden="true" tabindex="-1"></a>}</span>
<span id="cb1-16"><a href="#cb1-16" aria-hidden="true" tabindex="-1"></a></span>
<span id="cb1-17"><a href="#cb1-17" aria-hidden="true" tabindex="-1"></a><span class="co">/* minimize sidebar splitter */</span></span>
<span id="cb1-18"><a href="#cb1-18" aria-hidden="true" tabindex="-1"></a><span class="pp">#sidebar-splitter</span> {</span>
<span id="cb1-19"><a href="#cb1-19" aria-hidden="true" tabindex="-1"></a>    <span class="kw">background-color</span><span class="ch">:</span> <span class="cn">black</span><span class="at">!important</span><span class="op">;</span></span>
<span id="cb1-20"><a href="#cb1-20" aria-hidden="true" tabindex="-1"></a>    <span class="kw">width</span><span class="ch">:</span> <span class="dv">1</span><span class="dt">px</span><span class="at">!important</span><span class="op">;</span></span>
<span id="cb1-21"><a href="#cb1-21" aria-hidden="true" tabindex="-1"></a>    <span class="kw">border</span><span class="ch">:</span> <span class="dv">0</span><span class="dt">px</span><span class="at">!important</span><span class="op">;</span></span>
<span id="cb1-22"><a href="#cb1-22" aria-hidden="true" tabindex="-1"></a>}</span></code></pre></div>
<p>After that you have to enable usage of the userChrome file in <code>about:config</code>. On that page you are able to set values for configuration properties. Serch for the following config and toggle its value to be <code>true</code>.</p>
<div class="sourceCode" id="cb2"><pre class="sourceCode bash"><code class="sourceCode bash"><span id="cb2-1"><a href="#cb2-1" aria-hidden="true" tabindex="-1"></a><span class="ex">toolkit.legacyUserProfileCustomizations.stylesheets</span> = true</span></code></pre></div>
<p>The changes apply after a restart of the program.</p>
<p>Last quick thing: I like to cycle through the open tabs with Ctrl + Tab. I use the setting “Activate Ctrl+Tab cycles through tabs in recently used order” that can be set in <code>about:preferences</code>. That way I can always jump back to the previous tab instead of tabbing through the whole list. Try it, it’s nice.</p>
<p>That is all you have to do to clone my setup. Enjoy.</p>
<h2 id="what-i-wish-for">What I wish for</h2>
<p>I’m very happy with the setup as is at the moment. But there is one thing that I would really love to have. The browser supports multiple profiles with separate histories and shared sessions between tabs. In order to change profiles you have to start a different instance of the browser program.
At work I have different profiles for different customers I work for and can be logged in to several web applications using <a href="https://en.wikipedia.org/wiki/OpenID#OpenID_Connect_(OIDC)">OpenID Connect</a>. I have to run two browsers and switch between them on different workspaces.
It works but, I think it would be awesome to be able to use different profiles per tab in the same session. I imagine to be able to have a keybinding “open in profile 2” that opens in a profile other than my default.</p>
<p>What do you think? How are you using your browser?
I’d love to hear about it. Please <a href="https://norden.social/@asciijungle">get in touch with me on the fediverse</a>.</p>
<h2 id="footnotes">Footnotes</h2>
<section id="footnotes" class="footnotes footnotes-end-of-document" role="doc-endnotes">
<hr />
<ol>
<li id="fn1"><p>Servo is an independent browser engine implementation written in Rust: <a href="https://servo.org/">https://servo.org/</a>.<a href="#fnref1" class="footnote-back" role="doc-backlink">↩︎</a></p></li>
<li id="fn2"><p>Even though there has been a significant <a href="https://servo.org/wpt/">improvements in the recent years</a>, the Servo Browser Engine is <a href="https://arewebrowseryet.com/metrics/css/">not quite usable as a daily driver</a>.<a href="#fnref2" class="footnote-back" role="doc-backlink">↩︎</a></p></li>
<li id="fn3"><p>Others seem to have experienced the same. For example <a href="https://dev.to/kwstannard/tridactyl-and-the-death-of-tabs-14gj">KW Stannard has blogged about this on dev.to</a>.<a href="#fnref3" class="footnote-back" role="doc-backlink">↩︎</a></p></li>
<li id="fn4"><p>You can actually change a lot of the firefox UI with a local css file which is pretty awesome! check out: <a href="https://www.userchrome.org/what-is-userchrome-css.html">https://www.userchrome.org/what-is-userchrome-css.html</a><a href="#fnref4" class="footnote-back" role="doc-backlink">↩︎</a></p></li>
</ol>
</section>
    </section>
    <section class="author">
        <div class="image-container">
            <img src="https://asciijungle.com/images/author.jpg" alt="Portrait of the blog's author. Dude with full beard and short hair.">
        </div>
        <div class="about">
            <span><b>Author: Benjamin Brunzel</b></span>
            <span>I'm a software engineer based in Weilheim i.Ob., Germany.</span>
            <span>If you want to get in touch <a href="https://norden.social/@asciijungle"> contact me in the fediverse</a></span>
        </div>
    </section>
    
</article>
]]></summary>
</entry>
<entry>
    <title>39C3: My Major Topics of the Chaos Communication Congress</title>
    <link href="https://asciijungle.com/posts/2026-01-14-39C3-my-main-topics.html" />
    <id>https://asciijungle.com/posts/2026-01-14-39C3-my-main-topics.html</id>
    <published>2026-01-14T00:00:00Z</published>
    <updated>2026-01-14T00:00:00Z</updated>
    <summary type="html"><![CDATA[<article>
    <header>
        <h1>39C3: My Major Topics of the Chaos Communication Congress</h1>
        <section class="date">
            Posted on 2026-01-14
            
        </section>
        <section class="tldr">
            <div>TL;DR</div>
            <span>Key discussion points of the 39C3 congress from my point of view as an attendee were Digital suvereignity, Gen- and Agentic AI, as well as Hardware Security. Here I'll explain why and suggest talk recordings.</span>
        </section>
    </header>
    <section>
        <p>The CCC’s Chaos Communication Congress of is an event I’m always looking forward to. It’s the annual conference of the German and international sub culture around computers and the culture surrounding it. I’ve attended all four days and want to share my key takeaways as well as what I observed to be the major topics of 2025</p>
<h2 id="digital-sovereignty">Digital sovereignty</h2>
<p>The global political balance is shifting. Not just in the United States, populist movements are gaining traction. Relying on big tech vendors and trusting them with our data and using their infrastructure for critical communication has become a liability.</p>
<p>On the congress there were multiple talks but also self organized sessions around what options we have, and how to move away from IT services under direct control of other parties. Using selfhosted open source alternatives run on hardware run and controlled by someone you trust is the proposed solution.</p>
<p>The community proclaimed the <a href="https://di.day">Digital Independence Day</a>, a distributed event where people get help with moving their digital infrastructure towards self hosted alternatives.
The talk <a href="https://app.media.ccc.de/v/39c3-die-kanguru-rebellion-digital-independence-day">Die Känguru-Rebellion: Digital Independence Day</a> introduced the idea and gave a motivation on why it is important.</p>
<p>In addition to that vendors are selling devices that come with operating systems in their control and it is getting harder to write and distribute programs for them that are not approved by them. This has been discussed in the talk <a href="https://app.media.ccc.de/v/39c3-a-post-american-enshittification-resistant-internet">A post-American, enshittification-resistant internet</a>.</p>
<p>European citizens are customers and give a lot of power to the vendors and operators of critical digital infrastructure. It is on us to minimize risks of being held to ransom.</p>
<h2 id="gen--and-agentic-ai">Gen- and Agentic AI</h2>
<p>The rise of Artificial Intelligence powered features in software has also been addressed by a couple of talks and sessions. In <a href="https://app.media.ccc.de/v/39c3-ai-agent-ai-spy">AI Agent, AI Spy</a> the people behind the signal messenger talked about a new feature within the windows operating system currently in beta testing. Windows recall is a function that is taking a screenshot of the whole desktop every couple of seconds. These screenshots are then run through a text detection LLM run locally to extract information from the text displayed on the screen and store them in a local file for later usage by copilot.</p>
<p>According to security researchers this is extremely dangerous because it is creating a honeypot of very sensible data that also includes information that has been end to end encrypted because that encryption is terminated on the end device.</p>
<p>Features like that put users at extreme risk. In addition to that such features could be used to find out extreme sensitive information for example about employees.</p>
<p>Another talk went though the possible ways to attack software engineers using coding agent tools by doing prompt injection attacks:
<a href="https://app.media.ccc.de/v/39c3-agentic-probllms-exploiting-ai-computer-use-and-coding-agents">Agentic ProbLLMs: Exploiting AI Computer-Use and Coding Agents</a>.</p>
<p>Because todays Large Language Models (LLMs) do not have a separation of input data into context and commands, these issues will not be fixed but only mitigations will make it harder to exploit these design flaws. Currently, they cannot be prevented completely.</p>
<h2 id="hardware-security">Hardware Security</h2>
<p>Over the years security researchers have demonstrated various attacks on the hardware of computer systems like the CPU or the RAM. This years congress demonstrated that even though vendors invested in mitigations various of these attacks were proven to be exploitable in real world scenarios. The talk <a href="https://media.ccc.de/v/39c3-rowhammer-in-the-wild-large-scale-insights-from-flippyr-am">Rowhammer in the Wild: Large-Scale Insights from FlippyR.AM</a> evaluated a field study were various people ran tests on their system. These studies showed that a lot of systems can be targeted by rowhammer attacks.
Also <a href="https://media.ccc.de/v/39c3-spectre-in-the-real-world-leaking-your-private-data-from-the-cloud-with-cpu-vulnerabilities">Spectre in the real world: Leaking your private data from the cloud with CPU vulnerabilities</a> showed that it was possible to extract information from other customers CPU processes on a public cloud provider.
In addition to that the talk <a href="https://media.ccc.de/v/39c3-bluetooth-headphone-jacking-a-key-to-your-phone">Bluetooth Headphone Jacking: A Key to Your Phone</a> showed that insecure bluetooth devices that can act as an input device can be used to attack a computer paired to them.</p>
<h2 id="rise-of-far-right-politics">Rise of far right politics</h2>
<p>The last topic that I want to point out is the rise of far right political actors in a lot of western democracies. I especially liked the talk <a href="https://media.ccc.de/v/39c3-gegenmacht-best-of-informationsfreiheit">Gegenmacht - Best of Informationsfreiheit</a> which pointed out the importance of the Informationsfreiheitsgesetz, Germanys Freedom of Information Act, which allows civil society actors to use the courts to have information made publicly available by the government. This is effective to control a government and fight corruption.</p>
<h2 id="call-to-action">Call to action</h2>
<p>The chaos communication congress is a very important event with talks of outstanding quality. They point out techological and social hotspots. It is on us to have a look, discuss and address them. The event shows that technology always has a social impact on all of us. As people working with software it is our responsibility to keep that in mind when working on software and digital infrastructure.
All of the talks from 39C3 are being published on the <a href="https://media.ccc.de">media.ccc.de</a> portal. I encourage you to take a <a href="https://media.ccc.de/c/39c3">peek into the recordings</a>.</p>
    </section>
    <section class="author">
        <div class="image-container">
            <img src="https://asciijungle.com/images/author.jpg" alt="Portrait of the blog's author. Dude with full beard and short hair.">
        </div>
        <div class="about">
            <span><b>Author: Benjamin Brunzel</b></span>
            <span>I'm a software engineer based in Weilheim i.Ob., Germany.</span>
            <span>If you want to get in touch <a href="https://norden.social/@asciijungle"> contact me in the fediverse</a></span>
        </div>
    </section>
    
</article>
]]></summary>
</entry>
<entry>
    <title>Hexagonal Architecture and GenAI: A good Combination for Modern Software Development</title>
    <link href="https://asciijungle.com/posts/2025-07-24-hexagonal-architecture-and-genai.html" />
    <id>https://asciijungle.com/posts/2025-07-24-hexagonal-architecture-and-genai.html</id>
    <published>2025-07-24T00:00:00Z</published>
    <updated>2025-07-24T00:00:00Z</updated>
    <summary type="html"><![CDATA[<article>
    <header>
        <h1>Hexagonal Architecture and GenAI: A good Combination for Modern Software Development</h1>
        <section class="date">
            Posted on 2025-07-24
            
        </section>
        <section class="tldr">
            <div>TL;DR</div>
            <span>Key insights from a workshop on Hexagonal Architecture and how it synergizes with GenAI tools for more effective software development.</span>
        </section>
    </header>
    <section>
        <h2 id="hexagonal-architecture-and-genai-a-good-combination-for-modern-software-development">Hexagonal Architecture and GenAI: A good Combination for Modern Software Development</h2>
<h3 id="introduction">Introduction</h3>
<p>Some time ago, I had the pleasure of leading a workshop on “Hexagonal Architecture and AI Tools for Modern Software Development.” For those who couldn’t attend, I’d like to summarize the key insights here – particularly why Hexagonal Architecture harmonizes so well with GenAI tooling.</p>
<p>Hexagonal Architecture, also known as Ports-and-Adapters Architecture, is an architectural pattern that emphasizes separation of concerns. Without going too deep into details: it’s about isolating core business logic (the “Domain”) from external systems and technical details by using clearly defined interfaces (“Ports”) and interchangeable implementations (“Adapters”).</p>
<p>But why is this architecture also particularly advantageous when working with GenAI tools like rooCode? That’s what I’d like to explain in this post.</p>
<h3 id="benefits-of-hexagonal-architecture-for-genai-development">Benefits of Hexagonal Architecture for GenAI Development</h3>
<h4 id="clear-separation-of-concerns">Clear Separation of Concerns</h4>
<p>Like human developers, AI also benefits from clear context:</p>
<ul>
<li>The distinct structure shows where specific code can be found. This is ideally already evident from the directory listing with descriptive filenames.</li>
<li>The business logic is well-described in the domain with strong types</li>
<li>AI can focus on specific parts without needing to understand the entire system. That keeps the context small.</li>
<li>Changes to one part don’t affect others (reducing the risk of AI-introduced errors)</li>
</ul>
<h3 id="directory-structure">Directory Structure</h3>
<p>Let’s have a look at what an example of the directory structure might look like:</p>
<div class="sourceCode" id="cb1"><pre class="sourceCode bash"><code class="sourceCode bash"><span id="cb1-1"><a href="#cb1-1" aria-hidden="true" tabindex="-1"></a><span class="ex">src/</span></span>
<span id="cb1-2"><a href="#cb1-2" aria-hidden="true" tabindex="-1"></a><span class="ex">├──</span> domain/</span>
<span id="cb1-3"><a href="#cb1-3" aria-hidden="true" tabindex="-1"></a><span class="ex">│</span>   ├── model/     <span class="co"># Domain entities and value objects</span></span>
<span id="cb1-4"><a href="#cb1-4" aria-hidden="true" tabindex="-1"></a><span class="ex">│</span>   ├── service/   <span class="co"># Domain business logic</span></span>
<span id="cb1-5"><a href="#cb1-5" aria-hidden="true" tabindex="-1"></a><span class="ex">│</span>   └── ports/</span>
<span id="cb1-6"><a href="#cb1-6" aria-hidden="true" tabindex="-1"></a><span class="ex">│</span>       ├── in/    <span class="co"># Input ports (application APIs)</span></span>
<span id="cb1-7"><a href="#cb1-7" aria-hidden="true" tabindex="-1"></a><span class="ex">│</span>       └── out/   <span class="co"># Output ports (repositories, etc.)</span></span>
<span id="cb1-8"><a href="#cb1-8" aria-hidden="true" tabindex="-1"></a><span class="ex">├──</span> adapters/</span>
<span id="cb1-9"><a href="#cb1-9" aria-hidden="true" tabindex="-1"></a><span class="ex">│</span>   ├── in/        <span class="co"># Input adapters (controllers, UI, etc.)</span></span>
<span id="cb1-10"><a href="#cb1-10" aria-hidden="true" tabindex="-1"></a><span class="ex">│</span>   └── out/       <span class="co"># Output adapters (database, external services)</span></span></code></pre></div>
<p>That is a standard directory structure of a ports and adapters architecture that is also known to most coding models. That way the agent natuarly knows where to look for files. File names are also very important they should use the same terms that are used in the business logic.</p>
<h4 id="well-defined-interfaces-ports">Well-defined Interfaces (Ports)</h4>
<p>Ports are clearly defined interfaces that help AI, and also humans, understand expected behavior.
Type safety guides AI to generate compatible code. That’s why I encourage to use a strongly typed Language and use expressive types like Domain Entities or Enums over basic types like e.g. <code>String</code>.</p>
<p>Interface types serve as documentation for AI. They define the building blocks that are supposed to be used to build new functionality. When using Ports it’s easy to break development tasks down into manageable tasks. You can first write the business logic of a new feature against new or existing ports, and then generate the adapter implementations in a second step.</p>
<p>Here’s an example from our workshop example codebase of how a port definition might look like:</p>
<div class="sourceCode" id="cb2"><pre class="sourceCode typescript"><code class="sourceCode typescript"><span id="cb2-1"><a href="#cb2-1" aria-hidden="true" tabindex="-1"></a><span class="co">// Example: Database interface</span></span>
<span id="cb2-2"><a href="#cb2-2" aria-hidden="true" tabindex="-1"></a><span class="im">export</span> <span class="kw">interface</span> Database <span class="kw">extends</span> Adapter {</span>
<span id="cb2-3"><a href="#cb2-3" aria-hidden="true" tabindex="-1"></a>    <span class="fu">findById</span>(id<span class="op">:</span> MMSI)<span class="op">:</span> Vessel <span class="op">|</span> <span class="dt">undefined</span></span>
<span id="cb2-4"><a href="#cb2-4" aria-hidden="true" tabindex="-1"></a>    <span class="fu">saveVessel</span>(vessel<span class="op">:</span> Vessel)<span class="op">:</span> <span class="dt">void</span></span>
<span id="cb2-5"><a href="#cb2-5" aria-hidden="true" tabindex="-1"></a>    <span class="fu">findAllVessels</span>()<span class="op">:</span> Vessel[]<span class="op">;</span></span>
<span id="cb2-6"><a href="#cb2-6" aria-hidden="true" tabindex="-1"></a>    <span class="fu">savePosition</span>(id<span class="op">:</span> MMSI<span class="op">,</span> position<span class="op">:</span> <span class="bu">Position</span>)<span class="op">:</span> <span class="dt">void</span></span>
<span id="cb2-7"><a href="#cb2-7" aria-hidden="true" tabindex="-1"></a>    <span class="fu">findHistory</span>(id<span class="op">:</span> MMSI)<span class="op">:</span> VesselHistory <span class="op">|</span> <span class="dt">undefined</span></span>
<span id="cb2-8"><a href="#cb2-8" aria-hidden="true" tabindex="-1"></a>}</span></code></pre></div>
<p>With this clear interface definition, AI knows exactly which operations are available, which parameters are expected, and which return types to expect. This makes it much easier for AI to generate correct code.</p>
<h4 id="swappable-and-mockable-implementations-adapters">Swappable and Mockable Implementations (Adapters)</h4>
<p>Adapters are implementations of ports that connect the domain with external systems. They may be swapped with other implementations or mocks in tests. This interchangeability offers several advantages for working with GenAI tools:</p>
<p>AI-generated code can be tested in isolationk. New adapters can be developed in parallel with existing ones to ensure backward compatibility.
So if you ask AI to implement a new adapter, you can test it without affecting the rest of the system. If it doesn’t work as expected, you can simply revert to the previous adapter.
In our definition functional external dependencies may only be used in Adapter implementations. That way we ensure that our business logic stays pure. This can also be enforced by architecture tests.</p>
<h3 id="practical-example-vessel-tracking-application">Practical Example: Vessel Tracking Application</h3>
<p>In our workshop, we worked with an application for tracking vessel positions. This application tracks ships via AIS (Automatic Identification System), stores position data and vessel information, and displays current positions and history on a map.</p>
<figure id="fig:map-example">
<img src="https://asciijungle.com/images/map_example.png" />
<figcaption>Screenshot of the example application’s UI showing vessel positions in Hamburg harbor</figcaption>
</figure>
<p>In this application:</p>
<ul>
<li>The <strong>Domain</strong> contains the core business logic and entities such as Vessel, Position, and VesselHistory</li>
<li>The <strong>Ports</strong> define interfaces such as DataAccessPort, AisPort, and Database</li>
<li>The <strong>Adapters</strong> implement these interfaces to connect the domain with external systems, such as WebAppAdapter, MqttAdapter, and InMemoryDatabase</li>
</ul>
<p>This clear structure makes it easier for GenAI tools to understand and extend the application.</p>
<h3 id="practical-workflow-with-genai-tools">Practical Workflow with GenAI Tools</h3>
<p>During the workshop, we developed a practical workflow for working with GenAI tools in a hexagonal architecture.
First, create an implementation plan, then implement this plan step by step and Continuously test and refine the outcome.</p>
<h4 id="division-of-labor-between-developers-and-ai">Division of Labor Between Developers and AI</h4>
<p>You can take over yourself whenever you see fit. One strategy might be:</p>
<ol type="1">
<li>You as a developer define the domain and ports</li>
<li>AI implements business functions on the defined types</li>
<li>You define testcases and let the test code generate</li>
<li>AI creates adapter implementations</li>
</ol>
<p>That way you stay in control and there is at now point in time too much code generated so that it would be too much to review.</p>
<h4 id="test-driven-development">Test-Driven Development</h4>
<p>Hexagonal architecture nicely supports a test-driven approach. You can define test cases for the expected functionality in prosa text. Then you let the AI implement the code that fulfills these tests. Because of the Architecture you can always test implementations in isolation before integrating them into the overall system. You can mock your Ports for extensive coverage of your business logic. That way you’ll get a good confidence that the resulting system does what it should.
RooCode can run unit and architecture tests independently and thus correct errors directly from within the chat.</p>
<h3 id="conclusion">Conclusion</h3>
<p>In my eyes Hexagonal Architecture provides an ideal foundation for working with GenAI tools like rooCode:</p>
<ul>
<li><strong>Clear separation of concerns</strong> allows AI to understand and modify specific parts of the code without affecting others.</li>
<li><strong>Well-defined interfaces</strong> make it easier for AI to understand expected behavior and generate compatible code.</li>
<li><strong>Swappable implementations</strong> enable testing AI-generated code in isolation before it’s integrated.</li>
</ul>
<p>By applying this architecture, development teams can use GenAI tools more effectively to accelerate development, reduce errors, and improve code quality. The overhead of implementing abstraction layers is not such a burden when using GenAI tools. The clear boundaries and contracts provided by the architecture help AI generate correct and compatible code, while the isolation of components reduces the risk of AI-introduced errors affecting the entire system. Thus your code base becomes manageable even over lots of iterations.</p>
<p>I’d like to hear about your expeciences. Did you try something similar?</p>
    </section>
    <section class="author">
        <div class="image-container">
            <img src="https://asciijungle.com/images/author.jpg" alt="Portrait of the blog's author. Dude with full beard and short hair.">
        </div>
        <div class="about">
            <span><b>Author: Benjamin Brunzel</b></span>
            <span>I'm a software engineer based in Weilheim i.Ob., Germany.</span>
            <span>If you want to get in touch <a href="https://norden.social/@asciijungle"> contact me in the fediverse</a></span>
        </div>
    </section>
    
</article>
]]></summary>
</entry>
<entry>
    <title>Debugging File Permissions in AWS ECS Tasks</title>
    <link href="https://asciijungle.com/posts/2025-05-06-debugging-file-permissions-in-aws-ecs.html" />
    <id>https://asciijungle.com/posts/2025-05-06-debugging-file-permissions-in-aws-ecs.html</id>
    <published>2025-05-06T00:00:00Z</published>
    <updated>2025-05-06T00:00:00Z</updated>
    <summary type="html"><![CDATA[<article>
    <header>
        <h1>Debugging File Permissions in AWS ECS Tasks</h1>
        <section class="date">
            Posted on 2025-05-06
            
        </section>
        <section class="tldr">
            <div>TL;DR</div>
            <span>How I solved file permission issues in AWS ECS tasks when running containers with unprivileged users, read-only root filesystems, and writable temporary directories.</span>
        </section>
    </header>
    <section>
        <p>When working with containerized applications in AWS ECS, you might encounter file permission issues, especially when implementing security best practices. Recently, I had to debug file permissions in an AWS ECS task with the following requirements:</p>
<ul>
<li>The process within the container must run as an unprivileged user</li>
<li>The root file system must be mounted as read-only</li>
<li>The process must be able to write to the /tmp directory</li>
<li>The contents of the /tmp directory should be cleared on container start</li>
<li>The container runs in AWS ECS with Fargate backend</li>
</ul>
<p>Me and the team tried multiple approaches. Involving EFS and S3 as volumes meant we had to implement the clearing the /tmp directory on container start. Defining and mounting an ephemeral storage volume caused trouble because it was mounted as the root user so it cannot be used by the unprivileged user.
Then I stumbled accross a solution that was posted in a subreddit<a href="#fn1" class="footnote-ref" id="fnref1" role="doc-noteref"><sup>1</sup></a>. They suggested to define a Docker volume in the Dockerfile and have ECS create an ephemeral storage mount automatically.</p>
<div class="sourceCode" id="cb1"><pre class="sourceCode dockerfile"><code class="sourceCode dockerfile"><span id="cb1-1"><a href="#cb1-1" aria-hidden="true" tabindex="-1"></a><span class="kw">VOLUME</span> /tmp</span></code></pre></div>
<p>In this post, I’ll share my debugging approach used to validate this solution. The debugging approach is not limited to the use of AWS ECS. It can be of value for all container environments such as kubernetes or plain docker.</p>
<h3 id="debugging-with-an-overriden-container-entrypoint">Debugging with an overriden Container Entrypoint</h3>
<p>When troubleshooting container permission issues, it’s helpful to use simple CLI tools to check the current user and directory permissions. I modified my container’s entry point in the ECS task definition to run a series of diagnostic commands:</p>
<div class="sourceCode" id="cb2"><pre class="sourceCode terraform"><code class="sourceCode terraform"><span id="cb2-1"><a href="#cb2-1" aria-hidden="true" tabindex="-1"></a><span class="kw">resource</span> <span class="st">&quot;aws_ecs_task_definition&quot;</span> <span class="st">&quot;my-task&quot;</span> {</span>
<span id="cb2-2"><a href="#cb2-2" aria-hidden="true" tabindex="-1"></a>  family                   <span class="op">=</span> <span class="st">&quot;service&quot;</span></span>
<span id="cb2-3"><a href="#cb2-3" aria-hidden="true" tabindex="-1"></a>  network_mode             <span class="op">=</span> <span class="st">&quot;awsvpc&quot;</span></span>
<span id="cb2-4"><a href="#cb2-4" aria-hidden="true" tabindex="-1"></a>  requires_compatibilities <span class="op">=</span> [<span class="st">&quot;FARGATE&quot;</span>]</span>
<span id="cb2-5"><a href="#cb2-5" aria-hidden="true" tabindex="-1"></a>  cpu                      <span class="op">=</span> <span class="st">&quot;256&quot;</span></span>
<span id="cb2-6"><a href="#cb2-6" aria-hidden="true" tabindex="-1"></a>  memory                   <span class="op">=</span> <span class="st">&quot;512&quot;</span></span>
<span id="cb2-7"><a href="#cb2-7" aria-hidden="true" tabindex="-1"></a></span>
<span id="cb2-8"><a href="#cb2-8" aria-hidden="true" tabindex="-1"></a>  execution_role_arn <span class="op">=</span> aws_iam_role.ecs<span class="op">-</span>task<span class="op">-</span>execution<span class="op">-</span>role.arn</span>
<span id="cb2-9"><a href="#cb2-9" aria-hidden="true" tabindex="-1"></a>  task_role_arn <span class="op">=</span> aws_iam_role.ecs<span class="op">-</span>task<span class="op">-</span>execution<span class="op">-</span>role.arn</span>
<span id="cb2-10"><a href="#cb2-10" aria-hidden="true" tabindex="-1"></a></span>
<span id="cb2-11"><a href="#cb2-11" aria-hidden="true" tabindex="-1"></a>  container_definitions <span class="op">=</span> <span class="bu">jsonencode</span>([</span>
<span id="cb2-12"><a href="#cb2-12" aria-hidden="true" tabindex="-1"></a>    {</span>
<span id="cb2-13"><a href="#cb2-13" aria-hidden="true" tabindex="-1"></a>      name                     <span class="op">=</span> <span class="st">&quot;my-service&quot;</span></span>
<span id="cb2-14"><a href="#cb2-14" aria-hidden="true" tabindex="-1"></a>      image                    <span class="op">=</span> <span class="va">local</span>.image_uri</span>
<span id="cb2-15"><a href="#cb2-15" aria-hidden="true" tabindex="-1"></a>      cpu                      <span class="op">=</span> <span class="dv">256</span></span>
<span id="cb2-16"><a href="#cb2-16" aria-hidden="true" tabindex="-1"></a>      memory                   <span class="op">=</span> <span class="dv">512</span></span>
<span id="cb2-17"><a href="#cb2-17" aria-hidden="true" tabindex="-1"></a>      essential                <span class="op">=</span> <span class="va">true</span></span>
<span id="cb2-18"><a href="#cb2-18" aria-hidden="true" tabindex="-1"></a>      readonlyRootFilesystem   <span class="op">=</span> <span class="va">true</span></span>
<span id="cb2-19"><a href="#cb2-19" aria-hidden="true" tabindex="-1"></a>      user                     <span class="op">=</span> <span class="st">&quot;185&quot;</span></span>
<span id="cb2-20"><a href="#cb2-20" aria-hidden="true" tabindex="-1"></a>      portMappings <span class="op">=</span> [</span>
<span id="cb2-21"><a href="#cb2-21" aria-hidden="true" tabindex="-1"></a>        {</span>
<span id="cb2-22"><a href="#cb2-22" aria-hidden="true" tabindex="-1"></a>          containerPort <span class="op">=</span> <span class="dv">9090</span></span>
<span id="cb2-23"><a href="#cb2-23" aria-hidden="true" tabindex="-1"></a>          hostPort      <span class="op">=</span> <span class="dv">9090</span></span>
<span id="cb2-24"><a href="#cb2-24" aria-hidden="true" tabindex="-1"></a>        }</span>
<span id="cb2-25"><a href="#cb2-25" aria-hidden="true" tabindex="-1"></a>      ]</span>
<span id="cb2-26"><a href="#cb2-26" aria-hidden="true" tabindex="-1"></a>      entryPoint <span class="op">=</span> [</span>
<span id="cb2-27"><a href="#cb2-27" aria-hidden="true" tabindex="-1"></a>        <span class="st">&quot;sh&quot;</span>,</span>
<span id="cb2-28"><a href="#cb2-28" aria-hidden="true" tabindex="-1"></a>        <span class="st">&quot;-c&quot;</span></span>
<span id="cb2-29"><a href="#cb2-29" aria-hidden="true" tabindex="-1"></a>      ]</span>
<span id="cb2-30"><a href="#cb2-30" aria-hidden="true" tabindex="-1"></a>      command <span class="op">=</span> [</span>
<span id="cb2-31"><a href="#cb2-31" aria-hidden="true" tabindex="-1"></a>         <span class="st">&quot;set -x; whoami; ls -la /tmp; touch /tmp/itWorks; ls -la /tmp; cat /proc/mounts; df -h&quot;</span></span>
<span id="cb2-32"><a href="#cb2-32" aria-hidden="true" tabindex="-1"></a>      ]</span>
<span id="cb2-33"><a href="#cb2-33" aria-hidden="true" tabindex="-1"></a>    }</span>
<span id="cb2-34"><a href="#cb2-34" aria-hidden="true" tabindex="-1"></a>  ])</span>
<span id="cb2-35"><a href="#cb2-35" aria-hidden="true" tabindex="-1"></a>}</span>
<span id="cb2-36"><a href="#cb2-36" aria-hidden="true" tabindex="-1"></a></span></code></pre></div>
<p>Let’s break down these commands and understand what each one does:</p>
<h4 id="command-chaining-with-semicolons">Command Chaining with Semicolons</h4>
<p>In the shell, the semicolon `;` allows you to run multiple commands sequentially on a single line. Each command runs independently, regardless of whether the previous command succeeded or failed. This is different from using `&amp;&amp;` which only runs the next command if the previous command succeeded, or `||` which only runs the next command if the previous one failed. In this case failing means returning a non zero returncode.</p>
<h4 id="set--x">set -x</h4>
<p>The `set -x` command enables debug mode in the shell. When this mode is active, the shell prints each command before executing it, prefixed with a + sign. This is useful for debugging scripts as it shows what commands are being executed. Without this it can be difficult to see which command yielded which output.</p>
<h4 id="whoami">whoami</h4>
<p>The `whoami` command prints the current user’s username. In our case, it showed that the container was running as the “jboss” user, confirming that we were indeed running as an unprivileged user defined in the Dockerfile of the base image.</p>
<h4 id="ls--la-tmp">ls -la /tmp</h4>
<p>The `ls -la` command lists all files in a directory showing permissions, ownership, size, and modification time. This helped me see the current state of the /tmp directory and its permissions.</p>
<h4 id="touch-tmpitworks">touch /tmp/itWorks</h4>
<p>The `touch` command creates an empty file. I used it to test if the current user had write permissions in the /tmp directory. If this command succeeds, it confirms that the current user can write to the specified location.</p>
<h4 id="cat-procmounts">cat /proc/mounts</h4>
<p>The `cat /proc/mounts` command displays all mounted filesystems in the container. This is useful for seeing how filesystems are mounted. In this case, it showed that the root filesystem was indeed mounted as read-only (ro), while /tmp had its own mount point.</p>
<h4 id="df--h">df -h</h4>
<p>The `df -h` command shows disk space usage. This helped confirm which filesystems were available and how much space was allocated to them.</p>
<h3 id="analyzing-the-output">Analyzing the Output</h3>
<p>Let’s run the container and have a look at the output of these commands:</p>
<div class="sourceCode" id="cb3"><pre class="sourceCode bash"><code class="sourceCode bash"><span id="cb3-1"><a href="#cb3-1" aria-hidden="true" tabindex="-1"></a><span class="ex">+</span> whoami</span>
<span id="cb3-2"><a href="#cb3-2" aria-hidden="true" tabindex="-1"></a><span class="ex">jboss</span></span>
<span id="cb3-3"><a href="#cb3-3" aria-hidden="true" tabindex="-1"></a><span class="ex">+</span> ls <span class="at">-la</span> /tmp</span>
<span id="cb3-4"><a href="#cb3-4" aria-hidden="true" tabindex="-1"></a><span class="ex">total</span> 16</span>
<span id="cb3-5"><a href="#cb3-5" aria-hidden="true" tabindex="-1"></a><span class="ex">drwxrwxrwt</span> 2 root root 4096 Apr 24 11:55 .</span>
<span id="cb3-6"><a href="#cb3-6" aria-hidden="true" tabindex="-1"></a><span class="ex">drwxr-xr-x</span> 1 root root 4096 Apr 24 11:55 ..</span>
<span id="cb3-7"><a href="#cb3-7" aria-hidden="true" tabindex="-1"></a><span class="ex">-rwx------</span> 1 root root 291 Mar 13 11:05 ks-script-fb_e6y2x</span>
<span id="cb3-8"><a href="#cb3-8" aria-hidden="true" tabindex="-1"></a><span class="ex">-rwx------</span> 1 root root 701 Mar 13 11:05 ks-script-s7hte0c5</span>
<span id="cb3-9"><a href="#cb3-9" aria-hidden="true" tabindex="-1"></a><span class="ex">+</span> touch /tmp/itWorks</span>
<span id="cb3-10"><a href="#cb3-10" aria-hidden="true" tabindex="-1"></a><span class="ex">+</span> ls <span class="at">-la</span> /tmp</span>
<span id="cb3-11"><a href="#cb3-11" aria-hidden="true" tabindex="-1"></a><span class="ex">total</span> 16</span>
<span id="cb3-12"><a href="#cb3-12" aria-hidden="true" tabindex="-1"></a><span class="ex">drwxrwxrwt</span> 2 root root 4096 Apr 24 11:55 .</span>
<span id="cb3-13"><a href="#cb3-13" aria-hidden="true" tabindex="-1"></a><span class="ex">drwxr-xr-x</span> 1 root root 4096 Apr 24 11:55 ..</span>
<span id="cb3-14"><a href="#cb3-14" aria-hidden="true" tabindex="-1"></a><span class="ex">-rw-r--r--</span> 1 jboss root 0 Apr 24 11:55 itWorks</span>
<span id="cb3-15"><a href="#cb3-15" aria-hidden="true" tabindex="-1"></a><span class="ex">-rwx------</span> 1 root root 291 Mar 13 11:05 ks-script-fb_e6y2x</span>
<span id="cb3-16"><a href="#cb3-16" aria-hidden="true" tabindex="-1"></a><span class="ex">-rwx------</span> 1 root root 701 Mar 13 11:05 ks-script-s7hte0c5</span></code></pre></div>
<p>From this output, I could see:</p>
<ol type="1">
<li>The container was running as the “jboss” user (unprivileged) otherwise it would have stated `root`</li>
<li>The /tmp directory belongs to root bu it has the sticky bit set (t in drwxrwxrwt), which allows any user to create files but only the owner can delete them. This is common for the /tmp directory.</li>
<li>The “jboss” user was able to successfully create a file in /tmp</li>
</ol>
<p>The mount information was particularly revealing:</p>
<div class="sourceCode" id="cb4"><pre class="sourceCode bash"><code class="sourceCode bash"><span id="cb4-1"><a href="#cb4-1" aria-hidden="true" tabindex="-1"></a><span class="ex">+</span> cat /proc/mounts</span>
<span id="cb4-2"><a href="#cb4-2" aria-hidden="true" tabindex="-1"></a><span class="ex">overlay</span> / </span>
<span id="cb4-3"><a href="#cb4-3" aria-hidden="true" tabindex="-1"></a><span class="ex">overlay</span> ro,relatime,lowerdir=/var/lib/containerd/io.containerd.snapshotter.v1.overlayfs/snapshots/103/fs:/var/lib/containerd/io.containerd.snapshotter.v1.overlayfs/snapshots/102/fs:/var/lib/containerd/io.containerd.snapshotter.v1.overlayfs/snapshots/101/fs:/var/lib/containerd/io.containerd.snapshotter.v1.overlayfs/snapshots/100/fs:/var/lib/containerd/io.containerd.snapshotter.v1.overlayfs/snapshots/99/fs:/var/lib/containerd/io.containerd.snapshotter.v1.overlayfs/snapshots/93/fs,upperdir=/var/lib/containerd/io.containerd.snapshotter.v1.overlayfs/snapshots/107/fs,workdir=/var/lib/containerd/io.containerd.snapshotter.v1.overlayfs/snapshots/107/work 0 0</span>
<span id="cb4-4"><a href="#cb4-4" aria-hidden="true" tabindex="-1"></a><span class="ex">/dev/nvme1n1</span> /tmp ext4 rw,relatime 0 0</span></code></pre></div>
<p>This showed that:</p>
<ol type="1">
<li>The root filesystem (/) was mounted as read-only (ro)</li>
<li>The /tmp directory was mounted as a separate filesystem with read-write permissions (rw)</li>
</ol>
<p>The disk usage information confirmed this setup:</p>
<div class="sourceCode" id="cb5"><pre class="sourceCode bash"><code class="sourceCode bash"><span id="cb5-1"><a href="#cb5-1" aria-hidden="true" tabindex="-1"></a><span class="ex">+</span> df <span class="at">-h</span></span>
<span id="cb5-2"><a href="#cb5-2" aria-hidden="true" tabindex="-1"></a><span class="ex">Filesystem</span> Size Used Avail Use% Mounted on</span>
<span id="cb5-3"><a href="#cb5-3" aria-hidden="true" tabindex="-1"></a><span class="ex">overlay</span> 30G 11G 18G 37% /</span>
<span id="cb5-4"><a href="#cb5-4" aria-hidden="true" tabindex="-1"></a><span class="ex">tmpfs</span> 64M 0 64M 0% /dev</span>
<span id="cb5-5"><a href="#cb5-5" aria-hidden="true" tabindex="-1"></a><span class="ex">shm</span> 464M 0 464M 0% /dev/shm</span>
<span id="cb5-6"><a href="#cb5-6" aria-hidden="true" tabindex="-1"></a><span class="ex">tmpfs</span> 464M 0 464M 0% /sys/fs/cgroup</span>
<span id="cb5-7"><a href="#cb5-7" aria-hidden="true" tabindex="-1"></a><span class="ex">/dev/nvme1n1</span> 30G 11G 18G 37% /tmp</span>
<span id="cb5-8"><a href="#cb5-8" aria-hidden="true" tabindex="-1"></a><span class="ex">tmpfs</span> 464M 0 464M 0% /proc/acpi</span></code></pre></div>
<p>So in the end the definition of a docker volume for /tmp did the trick.
When you define a volume in your Dockerfile, ECS with Fargate automatically creates an ephemeral storage mount with the correct permissions for the user specified in your container. This eliminates the need for manual permission adjustments.
The storage used is AWS’s ephemeral storage, meaning it is temporary and will be removed when the container stops. This is ideal for temporary data storage needs.</p>
<h4 id="additional-considerations">Additional Considerations</h4>
<p>ECS on Fargate automatically handles permissions for volumes. It will create the montpoint folder owned by the user that is specified in your container (e.g., user 185 or jboss).
You can define multiple volumes if your application needs to write to different directories. If you need persistent storage instead of ephemeral, you would need to use EFS or other persistent storage options with ECS. This solution will not work for you in that case.
I have not found any resource documenting this, admittedly useful, implementation of ECS. I don’t know but this behaviour might change in the future. There is an open Github Issue with a discussion regarding this though<a href="#fn2" class="footnote-ref" id="fnref2" role="doc-noteref"><sup>2</sup></a>.</p>
<h3 id="conclusion">Conclusion</h3>
<p>Debugging file permissions in containerized environments can be challenging, but using simple CLI tools can provide valuable insights into what’s happening inside your container.
Hope that helps you out.</p>
<h3 id="footnotes">Footnotes</h3>
<section id="footnotes" class="footnotes footnotes-end-of-document" role="doc-endnotes">
<hr />
<ol>
<li id="fn1"><p><a href="https://www.reddit.com/r/aws/comments/1f4oiyn/comment/lkow7yu/?utm_source=share&amp;utm_medium=web3x&amp;utm_name=web3xcss&amp;utm_term=1&amp;utm_content=share_button">Reddit Discussion on ECS and Fargate Volume Permissions</a><a href="#fnref1" class="footnote-back" role="doc-backlink">↩︎</a></p></li>
<li id="fn2"><p><a href="https://github.com/aws/containers-roadmap/issues/938">AWS Containers Roadmap GitHub Issue</a><a href="#fnref2" class="footnote-back" role="doc-backlink">↩︎</a></p></li>
</ol>
</section>
    </section>
    <section class="author">
        <div class="image-container">
            <img src="https://asciijungle.com/images/author.jpg" alt="Portrait of the blog's author. Dude with full beard and short hair.">
        </div>
        <div class="about">
            <span><b>Author: Benjamin Brunzel</b></span>
            <span>I'm a software engineer based in Weilheim i.Ob., Germany.</span>
            <span>If you want to get in touch <a href="https://norden.social/@asciijungle"> contact me in the fediverse</a></span>
        </div>
    </section>
    
</article>
]]></summary>
</entry>

</feed>